![]()
![]()
![]()
![]()
It has never been easier to manage hundreds of computers. System Policy Editor allows you to configure settings for individual computers or for every computer in your entire network. System Policy Editor focuses primarily on performance and security.
In this section, you will look at all of the possible settings in System Policy Editor in COMMON.ADM and WINNT.ADM. After that, you will look at the conflict between named computers and the default computer's settings. Then comes the best part: You will learn about what settings you should use.
The settings are listed with the categories, policies, and parts for each separated by a forward slash, like this: Network/System Policies Update/Remote Update.
NOTE: Notice the explanations for each of the settings. This embedded information makes implementing policies much easier. It is what you hoped for in REGEDT32.EXE, but did not receive.
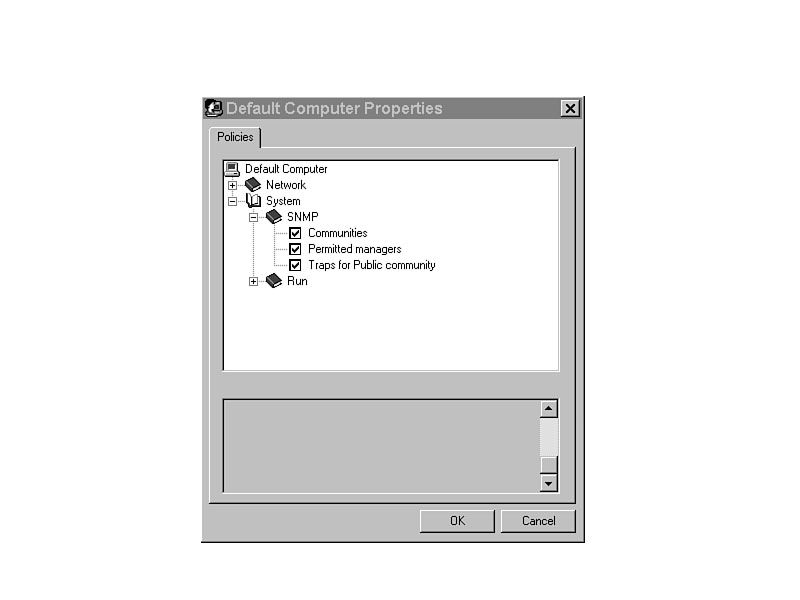
For every item in System Policy Editor, there are three possible settings (see Figure 31.1): Ignore, Activate, and Deactivate.
Figure 31.1. Three types of entries in System Policy Editor.
If the check box is gray, as the Communities check box
appears in Figure 31.1, the
setting is ignored and the Registry for that item is untouched. Whatever the current
setting is, it remains. If the value or key is not currently in the Registry, it
will not be inserted. This setting may also be called
inactive.
If the check box is checked, as the Permitted managers check box appears in Figure 31.1, the setting is activated and the necessary keys and/or values are added if required.
If the check box is cleared, as the Traps for Public community check box appears in Figure 31.1, the setting is deactivated regardless of the previous setting. Keys and/or values may be added to force the settings to an off position.
TIP: In a new policy, all of the items are set to gray (ignore). Whatever is currently set in the Registry will remain. Before you make any changes to the default computer or to any other named computer, create a specific policy for your own system (or the server on which you are running System Policy Editor). In that policy, deactivate every item. Then, if you configure settings that turn out to be disastrous, you will have at least one system that is unaffected.
NOTE: Opening a current policy or the local Registry allows you to see which items are currently selected. Some of the settings may be different, based on whether the system is a server or a workstation, and whether it is a domain controller.
Computer-related policies in COMMON.ADM are relatively few because the underlying functions of Windows NT and Windows 95 are very different. Many more of the computer-related items are in the named template files for NT and 95.
The ability to set a specific location and policy filename is critical in three different cases:
Windows NT looks in the NETLOGON share for NTCONFIG.POL. Windows 95, on the other hand, looks in NETLOGON for CONFIG.POL. If the policy file will have a different name or be in a different location, you can change the location where Windows NT looks and the filename for which it searches.
TIP: Can you use a common name for the policy file, or should you have separate files? The benefits are obvious for having a single file to manage. However, because Windows 95 cannot use the NT policy file (it is Unicode, and 95 requires a policy file in ASCII), you really have no choice. In the future, a consistent structure will allow you to make a single file and a consolidated policy.
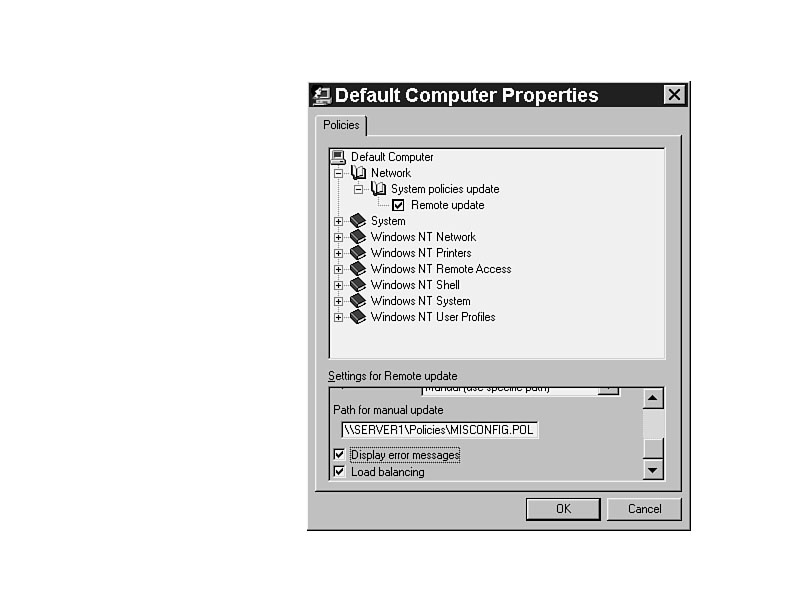
The Remote Update setting is a little deceptive, in that it says Manual in the Update mode. There is nothing manual about the update. The Registry is automatically updated at logon, but it just uses a different path. Enter the path as shown in Figure 31.2.
Figure 31.2. Setting a location for NTCONFIG.POL.
The check box in Figure 31.3 may also be important. It allows you to
select the Load
Balancing option. If the location you choose to set is \\Server1\Policies\MISCONFIG.POL
and SERVER1 is extremely busy, NT looks for the same path and file on other
logon servers (domain controllers).
WARNING: Unless you insert the name of the file, the system will not recognize it. Be very specific.
Figure 31.3. Enabling load balancing for better performance.
TIP: You can choose any name you want for this .POL file. Put the file name in the path, and NT will use it. The only computers that will use the specified file are the ones set with an option to do so.
SNMP (Simple Network Management Protocol) is used to get and set status information about a host on a TCP/IP network, including data about the user, the physical location of the host computer, and different services running on the host. (See Figure 31.4.)
Figure 31.4. SNMP options in COMMON.ADM.
A
community is a group of hosts, all running the SNMP service. The community
name is placed in the SNMP packet when the trap is sent. In nearly every instance,
all hosts belong to Public, which is the standard name for the common community.
This setting allows you to list the additional communities to which you want the server to belong. You may list as many as you want.
You can list all the managers in your system who can both change settings and generate errors for SNMP items. Valid entries include IP addresses of systems and host names.
A trap in SNMP is a block of data that indicates the failure of a request across the TCP/IP network, usually because of authentication. This can occur when the correct community name is not listed, when the host name does not match the IP address, or in other situations in which there is a failure to communicate.
Add the names of traps to use for testing authentication across the TCP/IP network.
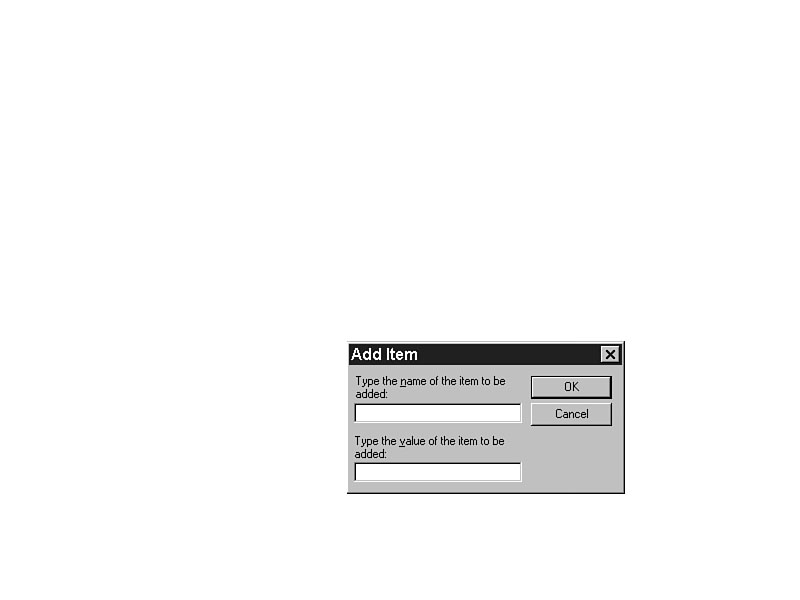
The Run function is used to set items to be run at startup. It's better to use the Run function than to use the Startup group because the Run function requires a Registry change for the user to disable it. Most users are not able to make those changes, so the likelihood of the application running as intended is much higher.
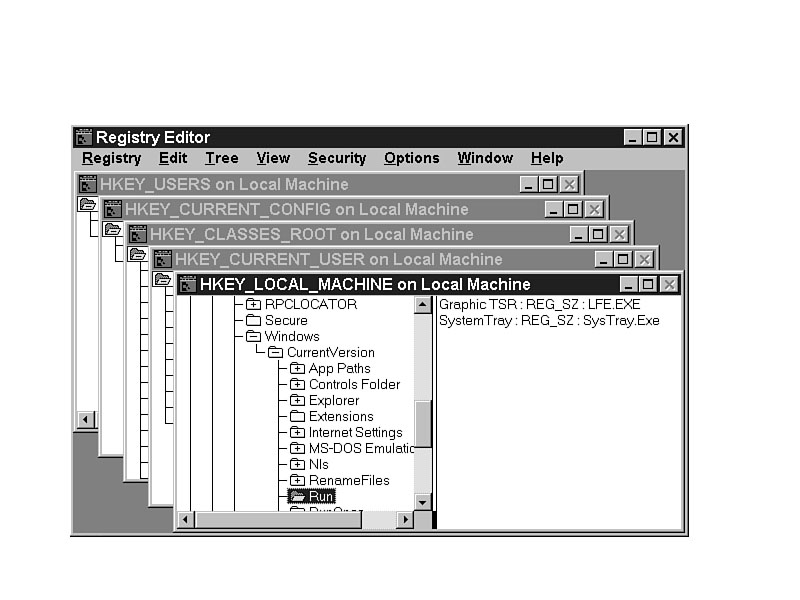
The value name (as shown in Figure 31.5) is just text information. The only time you see the value name is if the program remains in memory. In that case, the value name text is displayed in the Taskbar. The actual program is the value. After the policy is in place, the Registry for that system is updated, as shown in Figure 31.6.
TIP: Always use the full path to the application listed in the value. If the application location isn't in the path, the function will fail.
Figure 31.5. Adding items to be run at startup.
Figure 31.6. Items entered in the System Policy Editor Run function update the Registry.
The policies in WINNT.ADM are much more specific than those in COMMON.ADM. Some of the policies in WINNT.ADM are very similar to those in WINDOWS.ADM; the main difference between the two is the location of the Registry entry.
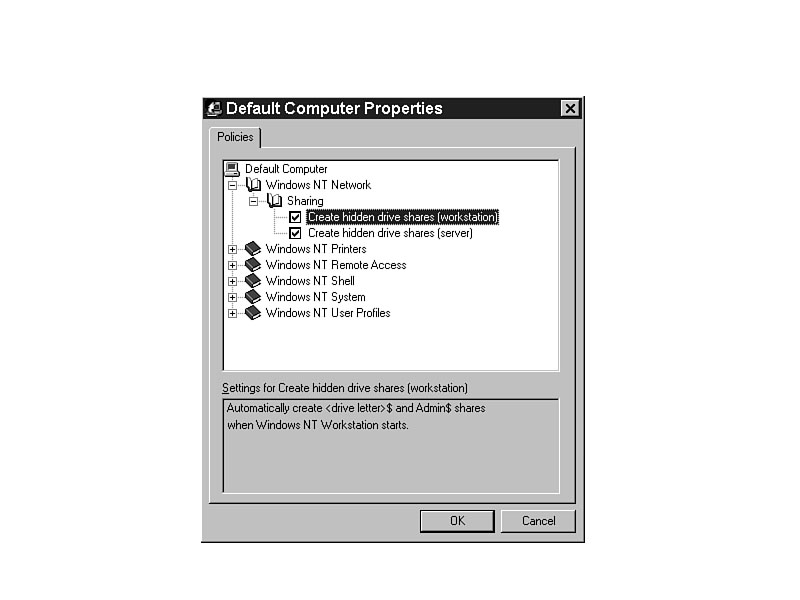
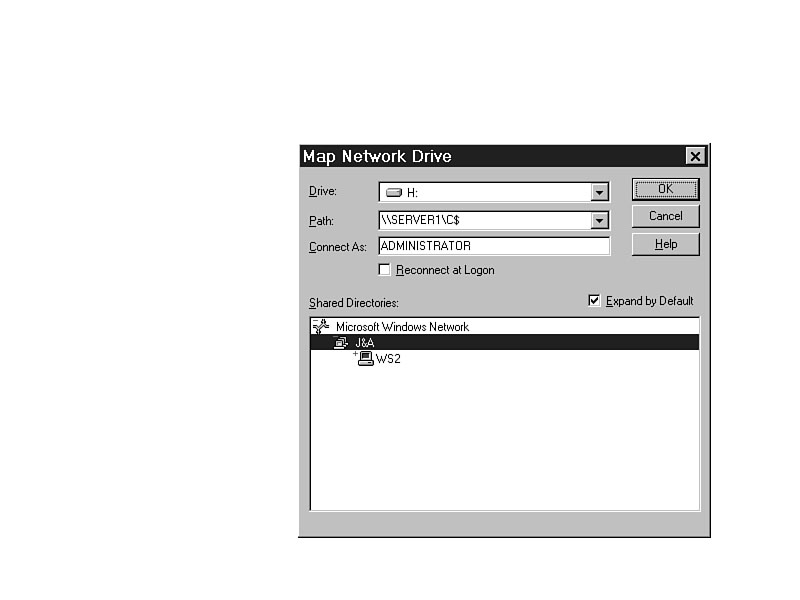
By default, NT creates hidden shares (also called administrative shares) for all fixed disk drives on all NT systems. (See Figure 31.7.) These shares are accessible (without a password) only by Administrator from the machine he has logged on to. Other users can access them with the correct password using Map Network Drive (seen in Figure 31.8), typing in the name of the share (\\SERVER1\C$, for instance).
Figure 31.7. Changing administrative share status.
Figure 31.8. Using an administrative share to gain access to a nonshared resource.
Only members of the Domain Admin global group or the local
Administrators group have
access to hidden shares. If any other user is logged on to the system, it is not
necessary to log him off, but you will need to connect to the share as an administrator,
supplying the correct password.
After the correct password is supplied, the root directory and all subdirectories and files are accessible even if they have not been shared in the normal way.
The default for NT is always to create these shares. This entry is used in System Policy Editor to disable the creation of these shares. That requires you to clear the check box.
TIP: You can manually create administrative, or hidden, shares for floppy drives, CD-ROM drives, and other removable media devices. They are not automatically created, even if this setting is turned on. To create the share, there must be a diskette or other appropriate medium in the drive. You are sharing the drive, not the medium, but the system needs access to the drive to complete the sharing process. After the share is created, any medium can be in the drive, and it can be accessed in the same way as shares on a network. This is particularly helpful if you need to use someone else's CD-ROM drive, or if you have no 5-1/4" floppy to use. NT 4.0 doesn't support older floppies anyway, but you can access that 5-1/4" floppy when it is on 3.5x on another machine on the network. You can then use it from another system across the network.
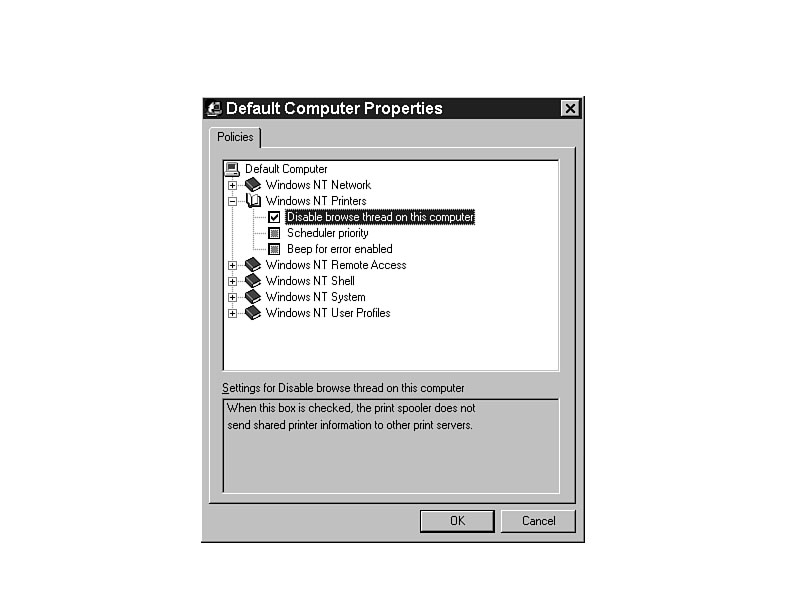
By enabling this setting at a specific system, that computer's printer shares no longer appear in the browse list in Connect Network Printer. The printers may still be accessed, but the name of the printer must be entered in order to do so. (See Figure 31.9.)
Figure 31.9. Removing the printer name from other browse lists.
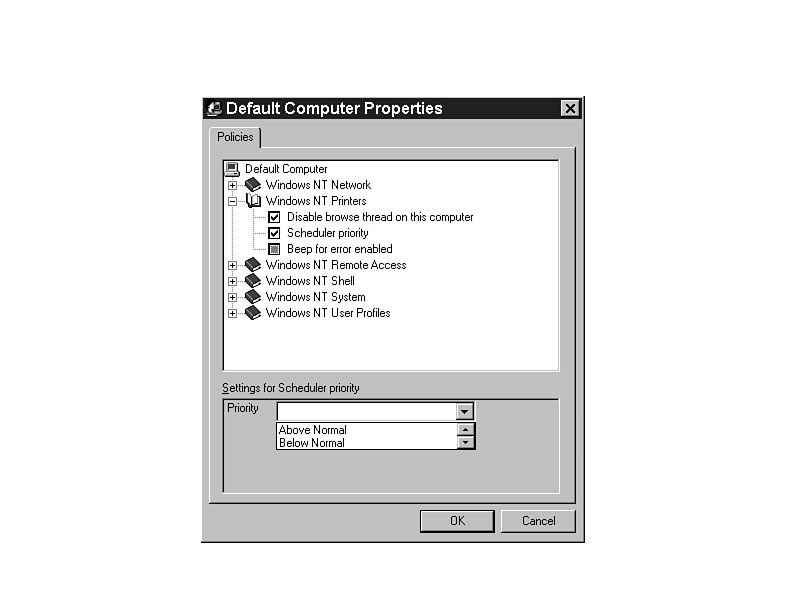
Set this printer's priority above or below normal with this setting. When set above normal, print jobs have a higher priority in combination with foreground and background application threads. Each thread gets a priority between 1 and 14. The higher the number, the sooner the thread gets processed. Boosting this number gets print jobs done faster, but application performance may suffer. (See Figure 31.10.)
Figure 31.10. Priority scheduling for print processes.
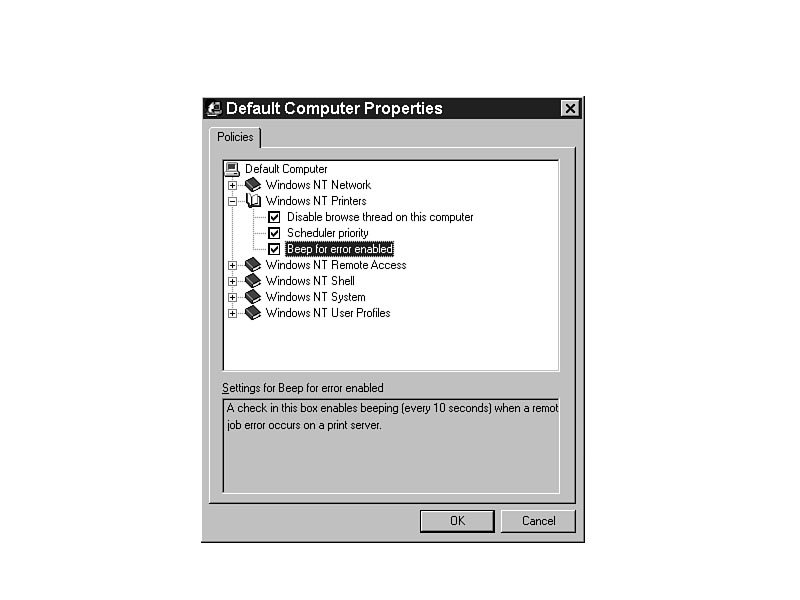
What an annoying thought: Every time there is an error, even a simple timeout error, the system beeps at you. In that case, you might not want the system to beep at you for print errors. On the other hand, if you are not sitting at the location of the print queue, you might not know there is a problem. Your user would wonder why the print job didn't work, and send another, and another, and another, assuming that he must have done something wrong in the way it was sent. Figure 31.11 shows the setting to turn the error beep on.
Figure 31.11. Turn on the error beeping at an unmanned print server.
This is one of the best ways to keep hackers out of your network. If they don't type the password correctly in the specified number of tries, they will be disconnected. This setting is made at the RAS server only. (See Figure 31.12.)
Figure 31.12. How many times will it take to get it right?
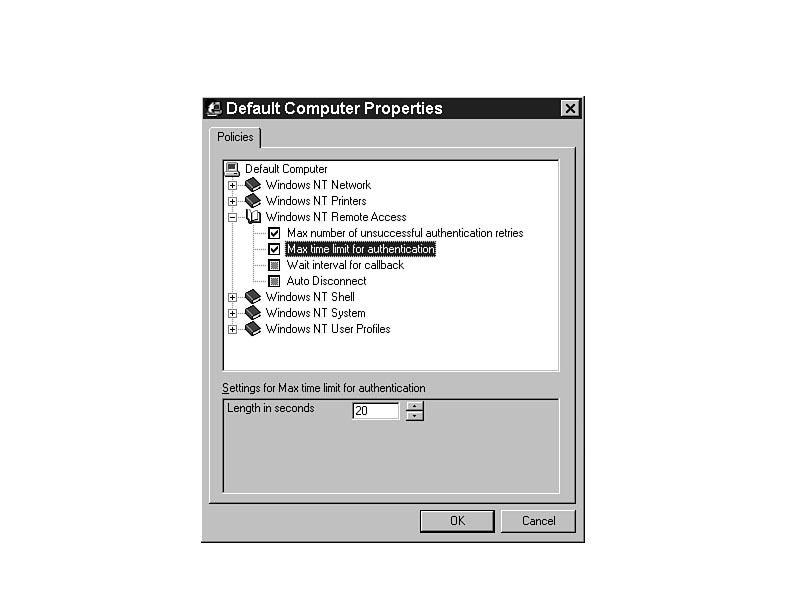
When set at the RAS Server, this setting determines how long the user can wait before entering a password and attempting a logon. It can be a valuable security item because a user who knows his password is more likely to enter it quickly than one who is guessing. The default time is 20 (seconds), but don't set it below 7, or your user may not be able to respond in time. (See Figure 31.13.)
Figure 31.13. Setting the maximum time for user input at logon.
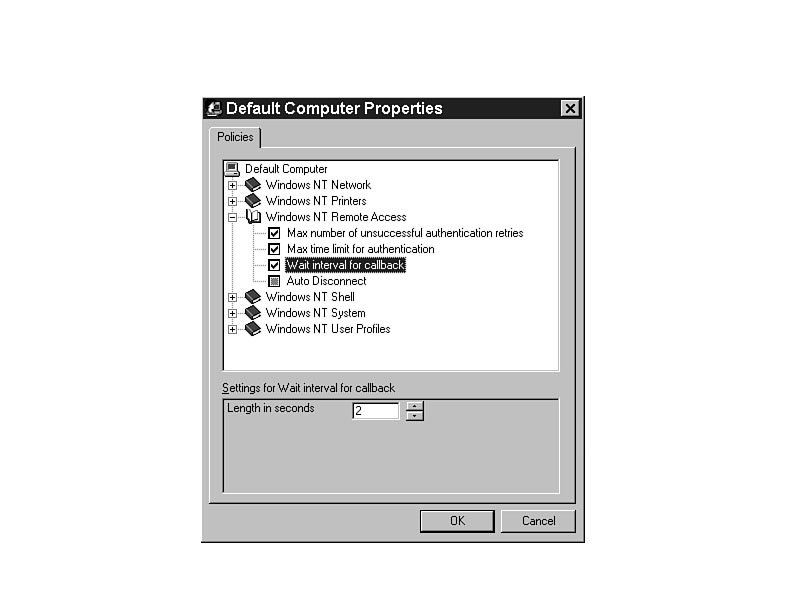
One security option is to have the server call the client back. If the user is not at the correct number, he won't be able to connect. Callback can be set up on a user-by-user basis in User Manager for Domains. This is set only on the RAS Server, and the default setting of 2 (seconds) is usually sufficient except when the delay in resetting the modem after disconnection is too long. In that case, increase this number. (See Figure 31.14.)
The autodisconnect is critical for freeing incoming telephone lines. If there is no activity across the lines for 20 minutes, RAS hangs up. Change this value to increase or decrease this amount of time. In a high-demand environment, you may want to decrease it. (See Figure 31.15.)
Figure 31.14. How long should I wait before calling back?
Figure 31.15. If there is no active traffic, end the connection.
If you want all users to be able to access the same applications, you must install the applications and put shortcuts to each in the folder specified in this setting. (See Figure 31.16.)
Some people want to use icons other than the ones that come with NT. Copy the files to the location specified in this tip to give users access to them. (See Figure 31.17.)
Figure 31.16. Setting the location for shared application shortcuts.
Figure 31.17. Setting the location for custom folder icons.
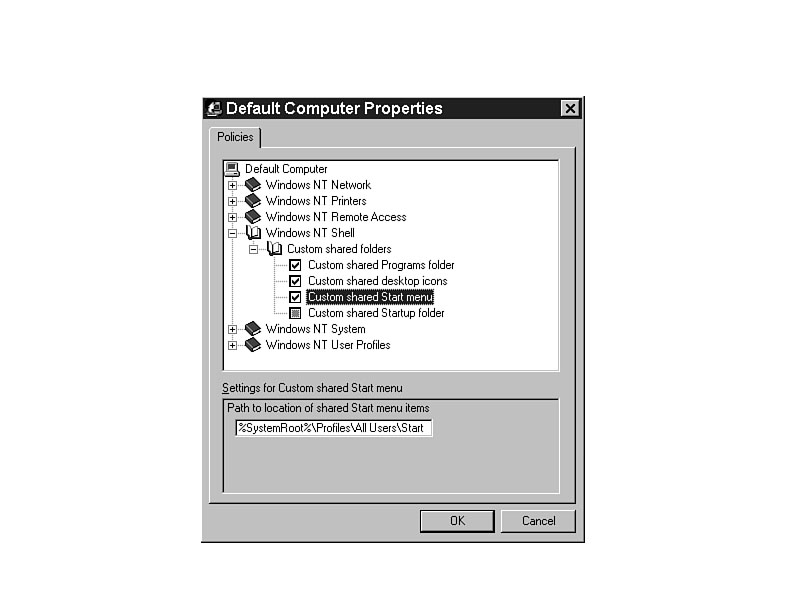
Want everyone's Start menu to have the same items? Copy shortcuts of those items to this location and change the Registry with this tip. (See Figure 31.18.)
If you want to easily specify what items load at startup, you can place shortcuts in here. These programs run after Explorer launches, and appear on the Taskbar. Those that you put in the Run section in COMMON.ADM do not show on the Taskbar, and launch prior to Explorer. (See Figure 31.19.)
Figure 31.18. The correct location for a standardized Start menu.
Figure 31.19. Startup items go here.
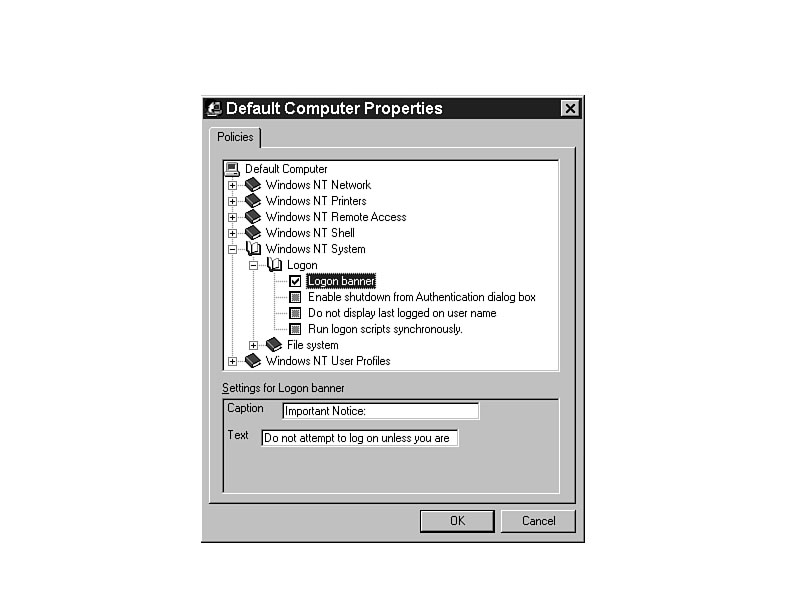
Originally, this setting was used to inform users of legal rights during logon. Now, however, this setting changes HKEY_LOCAL_COMPUTER and has no bearing on the user. The caption is the text in the title bar, and the other text is the data in the dialog box. (See Figure 31.20.)
TIP: Use this setting to notify users of specific information regarding the system to which they are logging on. For example, you might warn the user to never shut down the system because it is a server and others need access to it.
Figure 31.20. Special information for your users at logon.
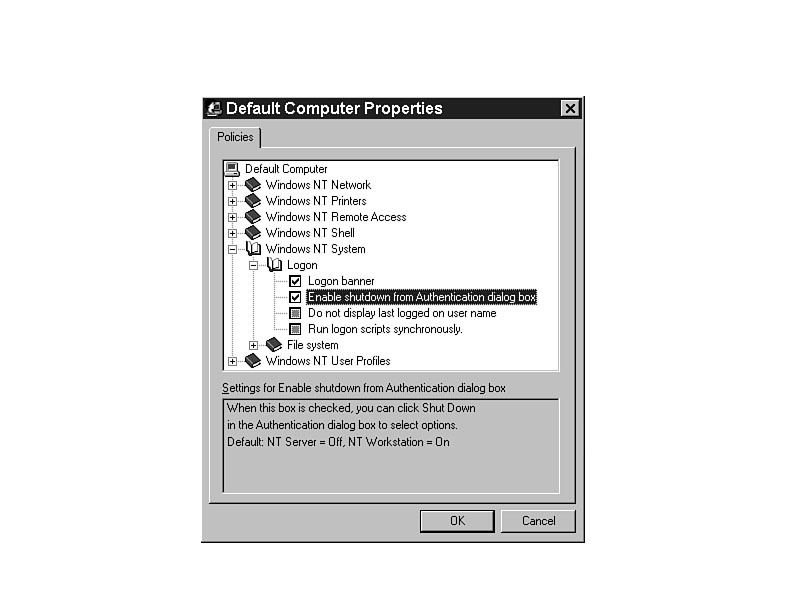
After the system has started, you may want to require the user to log on before
shutting down the system. Turning off this setting requires a logon before shutdown.
Requiring the user to log on before
shutting down the system can be a minor security
feature if you combine it with disabling the reset and power buttons or restricting
physical access to them. Then, the user must log on before he can shut the system
down and restart the computer into
another operating system or to a diskette-based
OS that has less security. (See Figure 31.21.)
Figure 31.21.
Enable shutdown from
the Authentication dialog box.
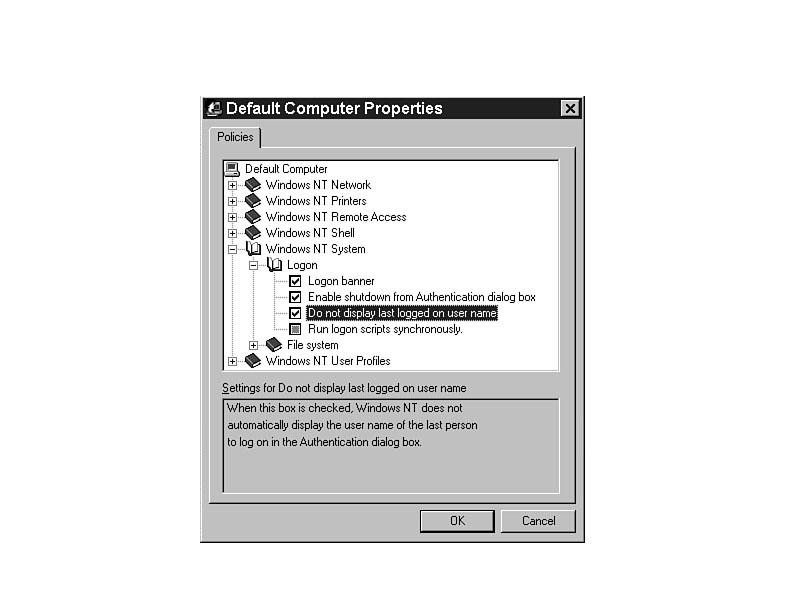
Normally, when you get to the logon dialog box, the only information required is the password. However, if you require a hacker to guess the user name also, it may be more difficult to break into the domain. Combine that with a complex naming scheme, and security is much stronger. (See Figure 31.22.)
Figure 31.22. Improve security by showing less at logon.
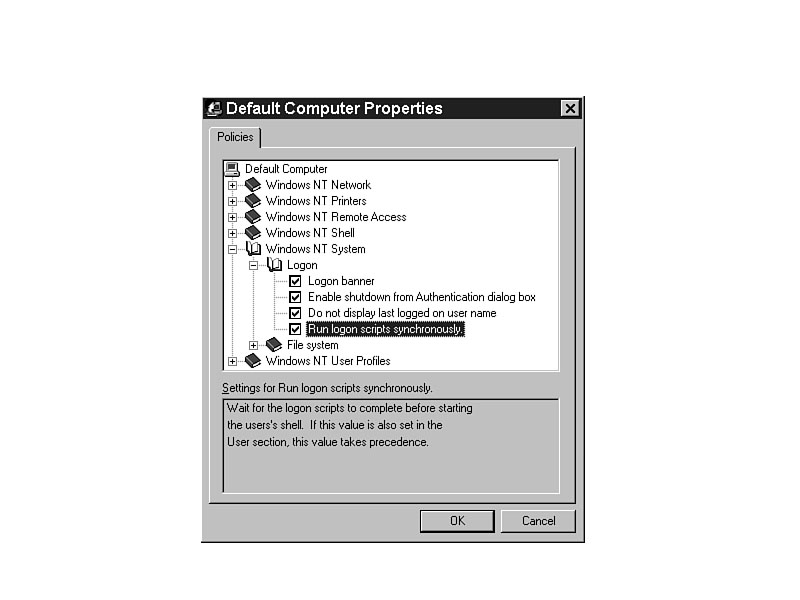
If this setting is disabled, some shortcuts in the startup group may start before their required drive mapping is completed. That causes errors and makes the startup process incorrect. (See Figure 31.23.)
WARNING: If your logon script calls another batch file at the end, it may not complete before the shell starts. To ensure that the shell waits for all of the commands, put them directly in the logon script file.
Figure 31.23. Make the shell wait its turn.
TIP: There is already a small delay between the time when the logon script starts and the time when the Startup group starts. You may be able to achieve the necessary results by putting all drive mapping at the very beginning of the logon script. Doing so makes your startup process faster.
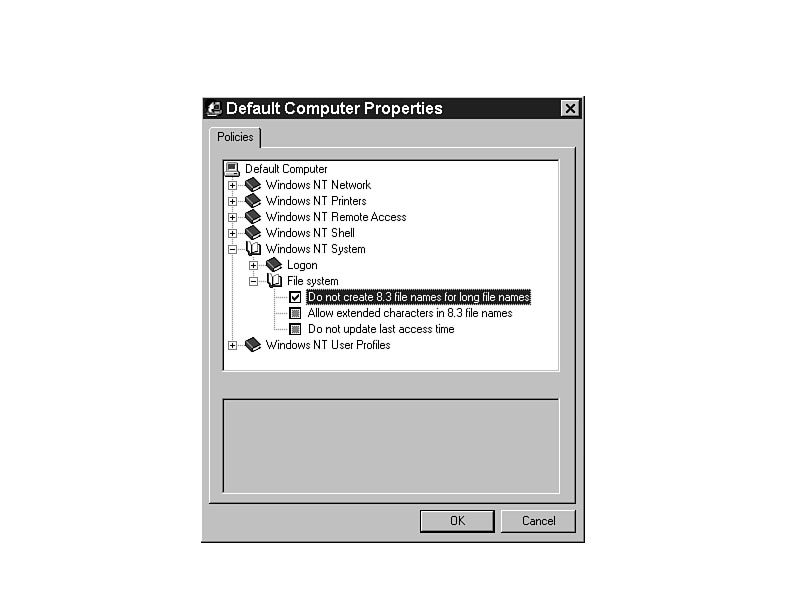
The only time an 8.3 filename (the original DOS file naming rule, with an 8-character filename and an optional 3-character extension) is required is in operating systems that cannot recognize the long filenames. The use of 16-bit Windows or DOS applications inside Windows NT is not affected by this setting. They do not use it. They get truncated filenames from the operating system on the fly. Disabling the creation of the 8.3 filenames improves performance in writing to the disk drive by eliminating the duplication of effort. (See Figure 31.24.)
TIP: Always disable the writing of 8.3 filenames for dedicated servers for SQL, Exchange, Internet Information Server, and others that will not be running any other OS or applications.
Another potential benefit is that DOS versions prior to 7.0 cannot read those long filenames. If someone gains access to your server and boots to DOS, he can't read much of what is written there.
Figure 31.24. Get rid of the past.
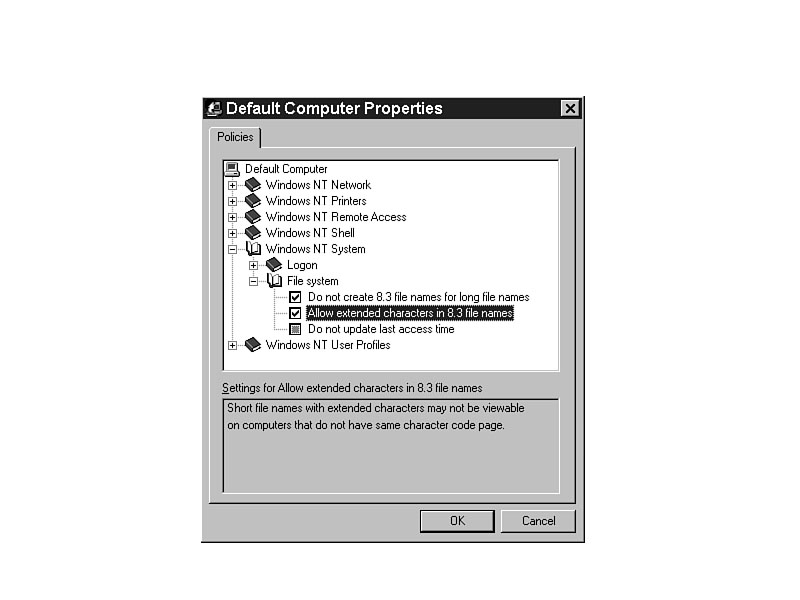
Extended characters are available in long filenames in Windows NT and Windows 95. Adding this setting allows you to use them when 8.3 filenames are created in 16-bit Windows or DOS applications. (See Figure 31.25.)
Figure 31.25. Extended characters in an 8.3 filename.
TIP: Have you ever had a file that was corrupted and you could never delete it, even though the directory seemed empty? Allowing extended characters may let you see that file and delete it, and then you can clean up your hard drive without a reformat.
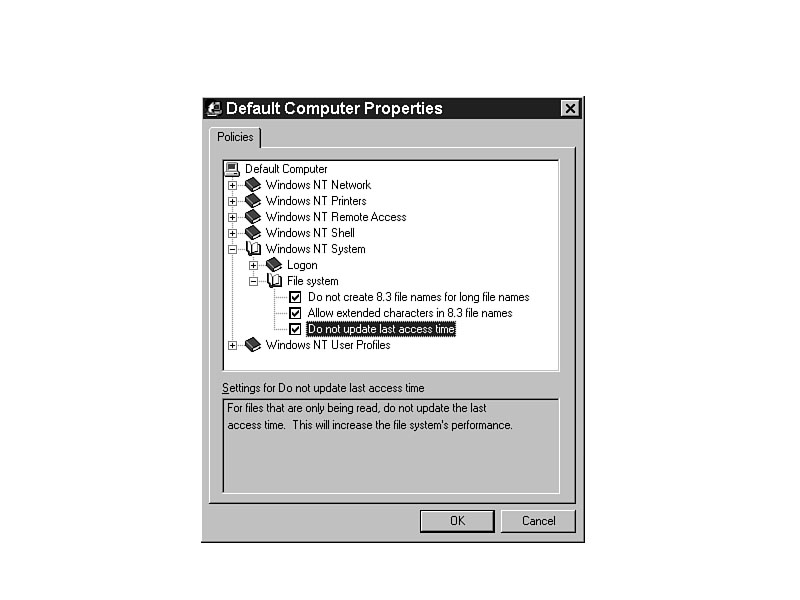
Even read-only files have access flags on them that indicates the last time the file was accessed. Enabling this setting shortens the writing time to the disk drive and boosts performance. It still updates the access information if the file is changed. (See Figure 31.26.)
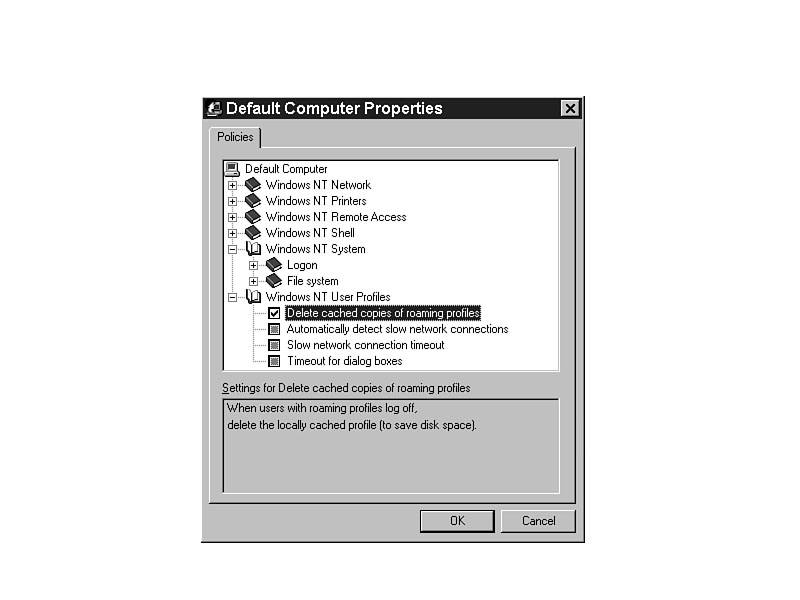
Figure 31.26. Boost your disk drive performance.Windows NT System/Windows NT User Profiles/Delete Cached Copies of Roaming Profiles.
Roaming user profiles are stored on the domain controller. When the user logs on
to the system, the user profile is loaded across
the network. All the information
is also cached to allow that profile to be used, even if the connection to the network
is slow or does not work. The user's desktop, icons, and other environment data does
not have to be re-created if the system cannot
connect to the domain controller.
Delete the cached profiles only if your network is very stable and the connections are sure. (See Figure 31.27.)
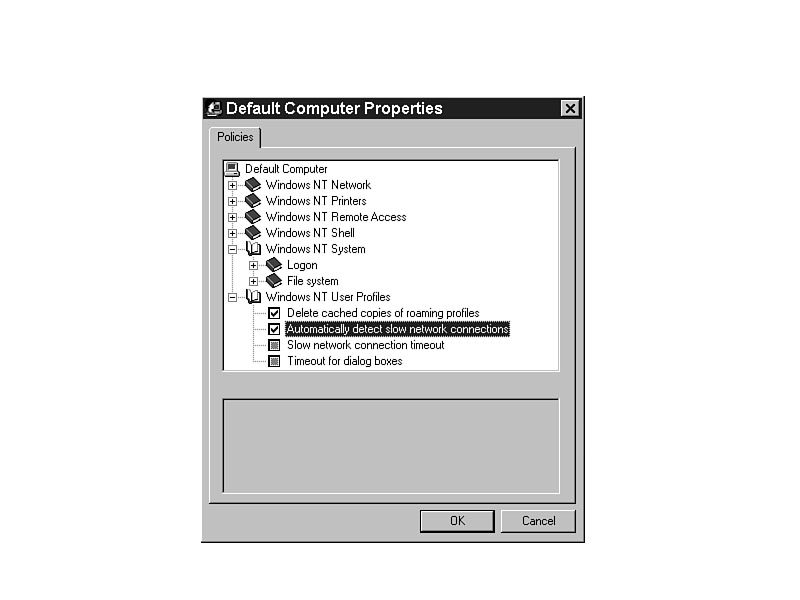
Figure 31.27. Delete cached profile information.Windows NT System/Windows NT User Profiles/Automatically Detect Slow Network Connections
The default for this setting is on even
without this setting. Slow network connections
affect the loading of profiles, the error messaging system, and many other communication
functions.
NOTE: The phrase slow network connection does not refer to ARCNet, LANTastic, or AT&T StarLAN. It refers to remote connections through routers, switches, gateways, and modems that do not respond quickly enough. After a specific threshold of time is passed, it is considered a slow network connection.
If you want the remote system to work exactly like a locally connected system, disable this setting. (See Figure 31.28.)
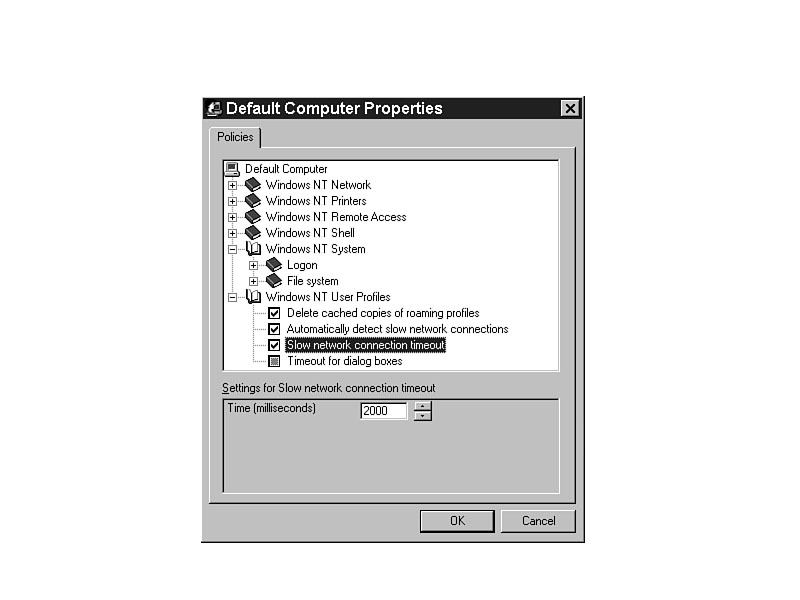
How long is too long? How slow is too slow? You get to determine that here. The default is 2000 (milliseconds), or 2 seconds. Increase that time to cut your system a little slack. (See Figure 31.29.)
Figure 31.28. Change the detection of slow network connections.
Figure 31.29. Setting the threshold for slow network connections.
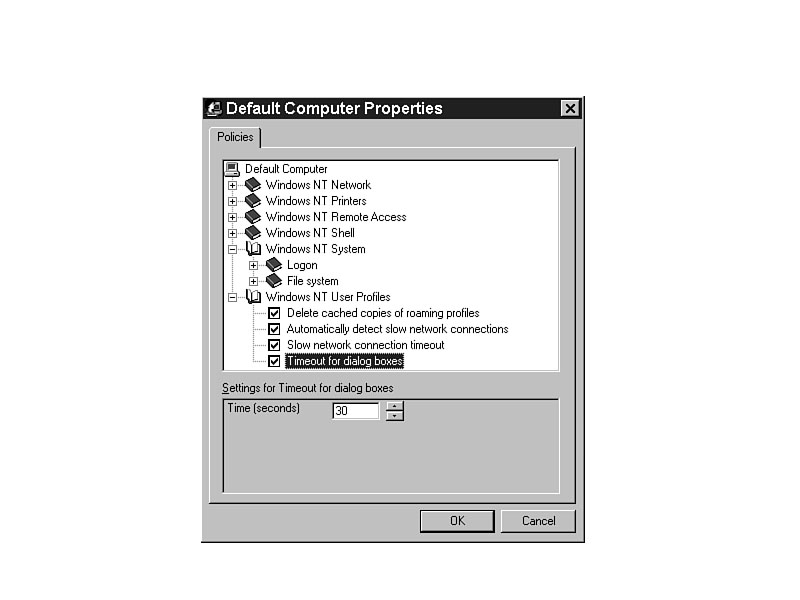
Some dialog boxes, such as the one that allows you to use a cached profile instead of downloading the profile from the server, are set to activate themselves if you do not respond to them in a specified period of time. If you set one such dialog box for a longer time, it waits for you. Set it for a shorter time and it goes on without you even if you are not there. (See Figure 31.30.)
Figure 31.30. How long will it wait?
To enhance security, set the entries in Table 31.1.
Table 31.1. Entries that can be configured to enhance security.
| ADM File | Policy |
| WINNT.ADM | Windows NT Network/Sharing/Create hidden drive shares |
| WINNT.ADM | Windows NT Printers/Disable browse thread on this computer |
| WINNT.ADM | Windows NT Remote Access/Max number of unsuccessful authentication retries |
| WINNT.ADM | Windows NT Remote Access/Max time limit for authentication |
| WINNT.ADM | Windows NT System/Logon/Enable shutdown from Authentication dialog box |
| WINNT.ADM | Windows NT System/Logon/Do not display last logged-on user name |
| WINNT.ADM | Windows NT System/File System/Do not create 8.3 filenames for long file names |
| ADM File | Policy |
| WINNT.ADM | Windows NT Printers/Scheduler priority |
| WINNT.ADM | Windows NT System/Logon/Run logon scripts synchronously |
| WINNT.ADM | Windows NT System/File System/Do not create 8.3 filenames for long filenames |
| WINNT.ADM | Windows NT System/File System/Do not update last access time |
| WINNT.ADM | Windows NT User Profiles/Timeout for dialog boxes |
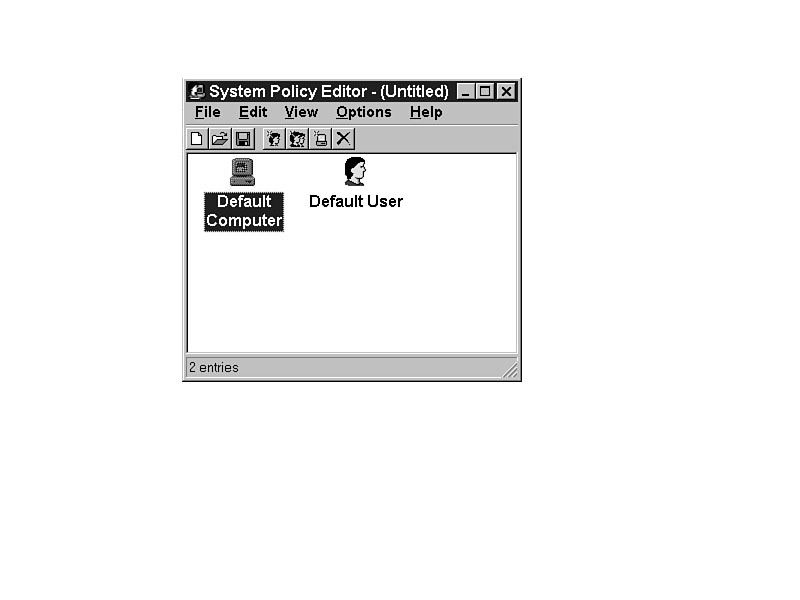
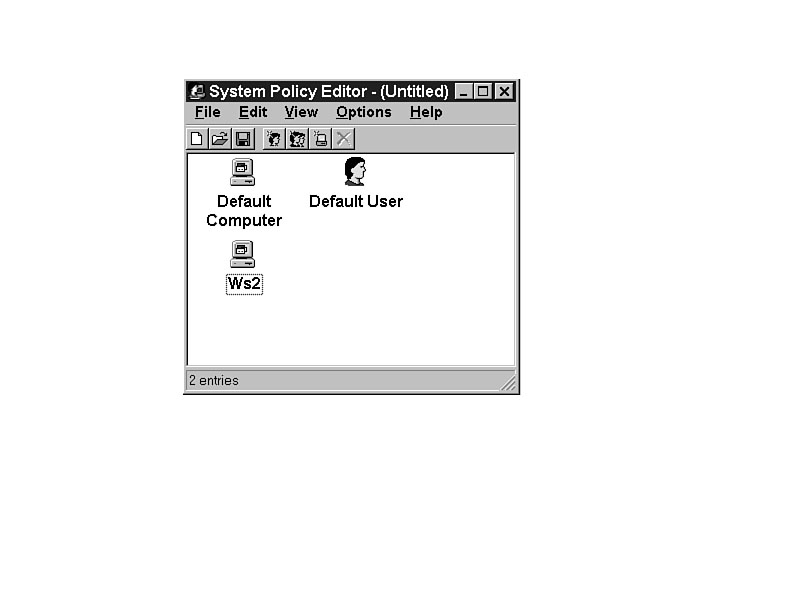
System Policy Editor creates two policies by default. One policy is created for the Default Computer, and another is created for the default user. (See Figure 31.31.)
Figure 31.31. System Policy Editor creates two default policies.
Setting system policies can be done either for all computers or for individual
computers.
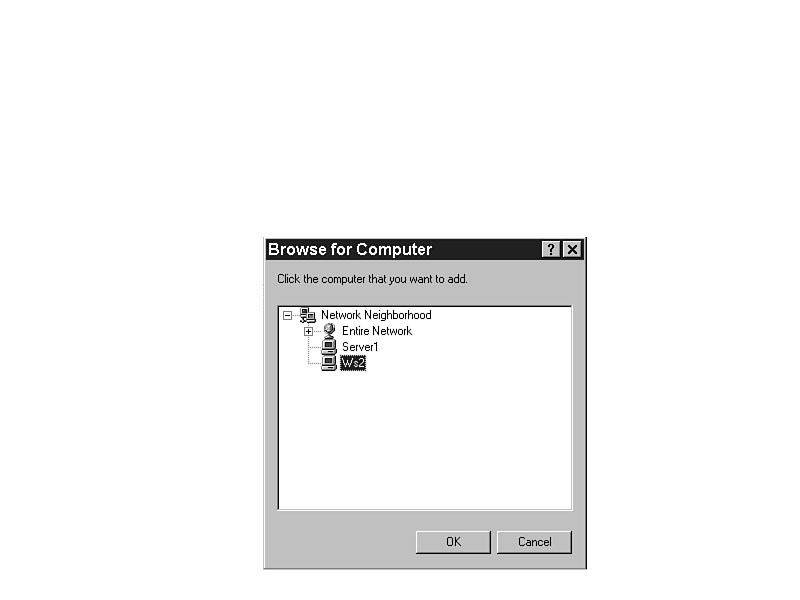
To name a specific computer and associate a policy with it, select Edit | Add Computer.
Type or browse for the NetBIOS name of the computer, and click OK. (See Figure 31.32.)
Figure 31.32. Choosing a computer for a specific policy.
If your computer isn't specifically named, you get the settings associated with the
Default Computer. With a policy in place for the named computer, as shown in Figure
31.33, any policy specified will overwrite the Registry. Any policy settings for
the named computer cannot affect any other systems, but the Default Computer policy
may still affect the named one if there is no setting in the named computer policy.
Figure 31.33. WS2 can have specific policies associated with it.
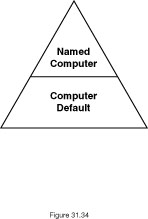
When policies are written into the Registry, the active policies (whether the policy is activated or deactivated) from the Default Computer are written first. (See Figure 31.34.) Then, active policies at each named computer get written.
Figure 31.34.
Default Computer policies get written to the Registry
first, followed
by named computer policies.
Default Computer policies get written to the Registry first, followed by named computer
policies.This is particularly important when the policies are in conflict with each
other. If the policy of the named computer is set to activate or deactivate, it makes
no difference what the setting is at the Default Computer. As an example, in
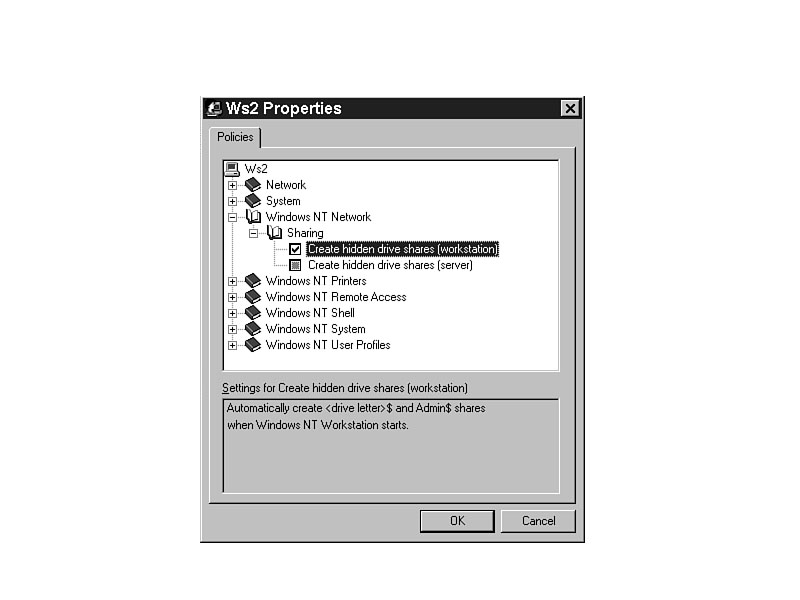
Figure
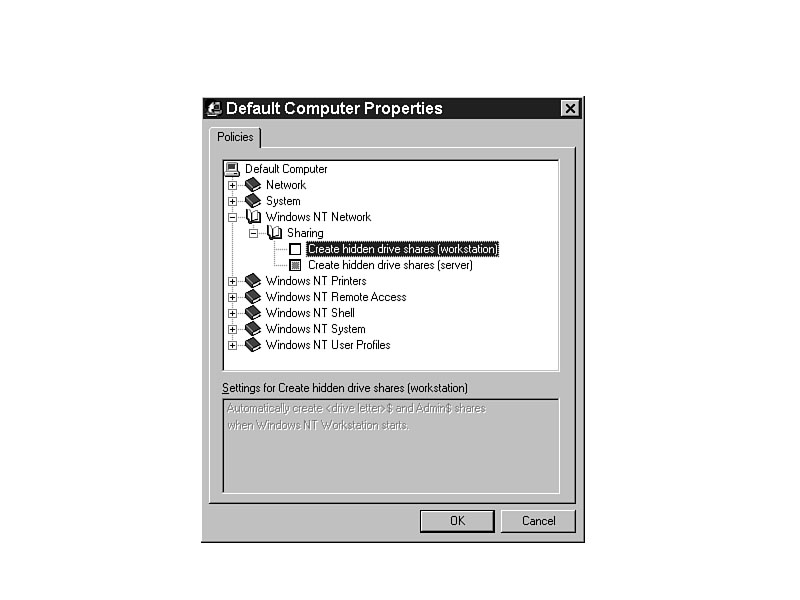
31.35, the computer named WS2 is set to create hidden drive shares. As shown in Figure
31.36, the Default Computer is set not to create them. The policy for WS2 is the
one that will take effect.
Figure 31.35. WS2 policy.
Figure 31.36. Default Computer policy, which is overridden by the WS2 policy.
In another instance, the policy associated with WS2 is ignored, and the policy associated
with Default Computer is implemented. In Figure 31.37, the policy for WS2 is set
to ignore
the NT Printer setting. As shown in Figure 31.38, the Default Computer
has the policy set to disable the browse thread. Because the WS2 policy is set to
use whatever is already there, it also disables the browse thread.
Figure 31.37. WS2 policy.Figure 31.38. Default Computer policy, which is not overridden by the WS2 policy in this case.
You can set any or all of these settings for individual computers or for every computer in your network. By choosing to use these settings, you can manage the computers in your network from a single NT server, and the policies can affect any computer in the network.
![]()
![]()
![]()
© Copyright, Macmillan Computer Publishing. All rights reserved.