![]()
![]()
![]()
![]()
Just as there are many options for policies for computers, there are many options for policies for users. However, the types of settings are different, and they follow the user, regardless of which Windows NT 4.0 system he logs onto.
Most of these settings restrict the user. The more challenges the user has and the more recurrent errors he makes, the more appropriate restrictions are.
NOTE: Do I like my users making mistakes? Absolutely! If they never made mistakes, they would never learn anything. I just want my users to always make new mistakes. If a user makes a new mistake, that means he is progressing. The problem I have is when users make the same mistakes over and over and over. If users continually make the same mistakes, it normally means they haven't learned from them. Your job as an administrator is to train users and help them recover from mistakes. I only restrict my users when they haven't learned from their mistakes, and when those mistakes are preventing them, and me, from being productive. Restrictions can be very powerful tools for augmenting your training process. Your users, just like you, had to start at the beginning. The point at which you are now is just a function of training. If a user continually makes the same mistakes, it shows that your training isn't working. It's possible that the user cannot be trained, but that is highly unlikely. It's more likely that you haven't done enough to help him learn. However, you'll occasionally find users who simply refuse to learn, or who are malicious. Those are the two cases in which restrictions are particularly important.
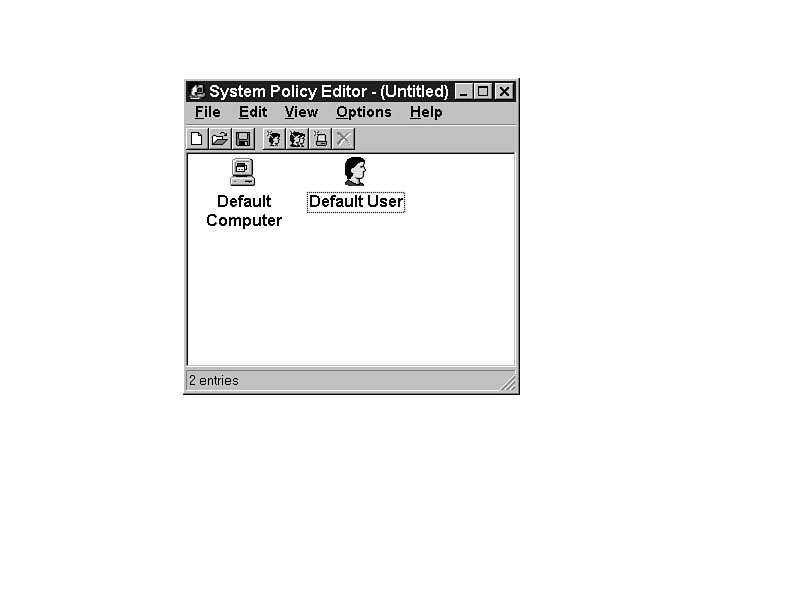
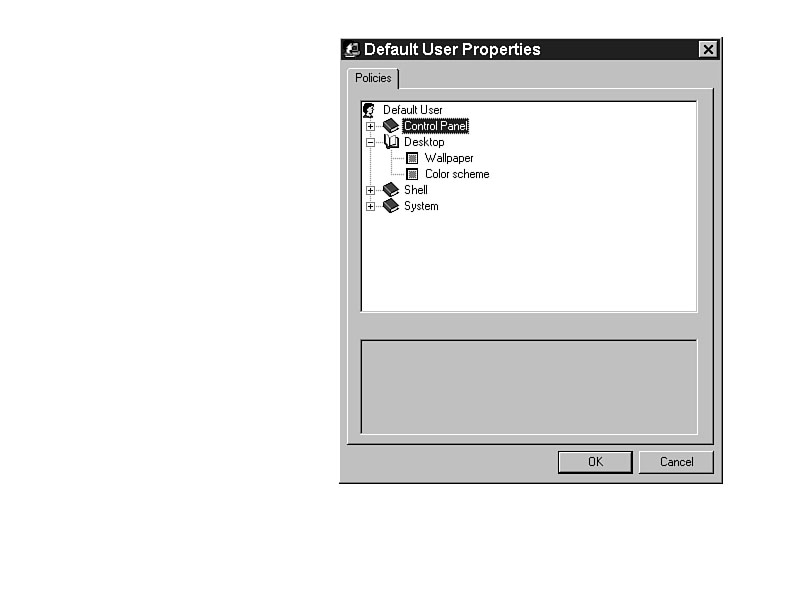
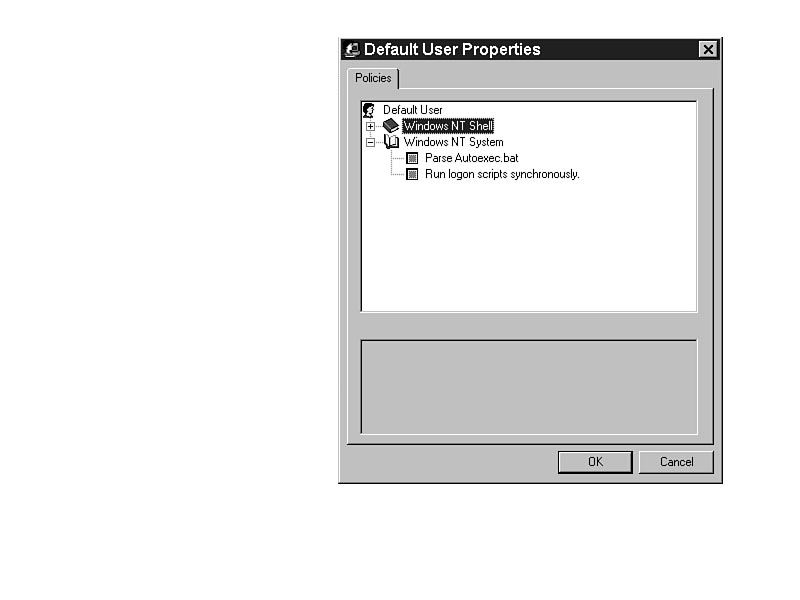
The default user is the unnamed user in the policy. Figure 32.1 shows the System Policy Editor screen for the Default User and Default Computer. Additionally, you can select individuals for whom you will assign a policy, or you can assign a policy to a group of users as designated in User Manager for Domains.
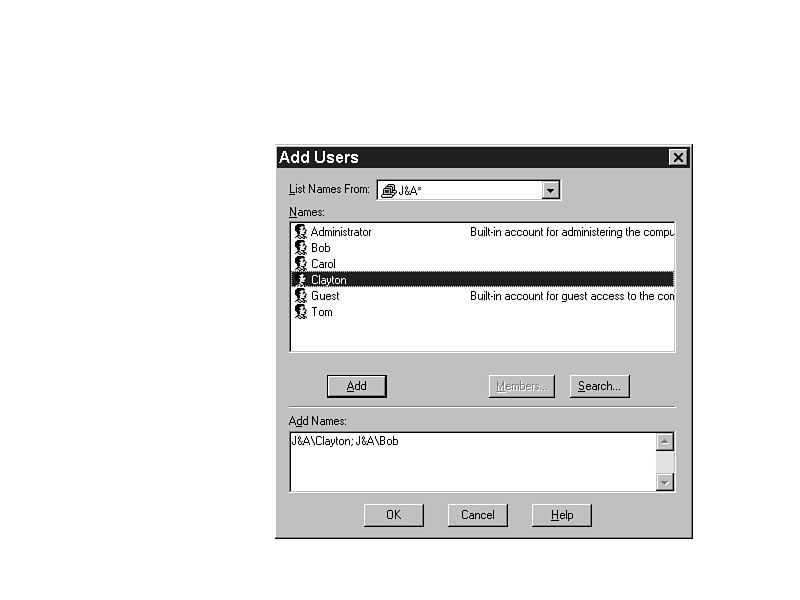
To add an individual policy, select Edit | Add User. Type the name of the user (it must be a user in User Manager for Domains) and click OK. (See Figure 32.2.) Alternatively, you can click Browse to see the list of users, and select one. That user will then have his own policy.
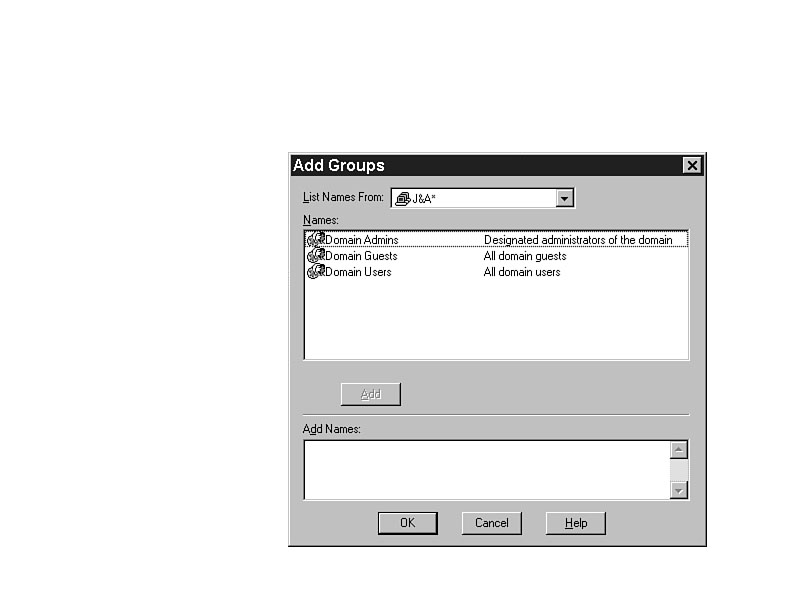
To add a group policy, select Edit | Add Group. Choose from a list of global groups from User Manager for Domains, or type the name of the group. You can add a group name that is not in User Manager for Domains, but it will have no effect, and none of the users will be affected by any change made to the policy of that group. (See Figure 32.3.)
Figure 32.1. Default user policies in System Policy Editor.
Figure 32.2.
Adding a user policy.
Figure 32.3. Adding
a group policy.
TIP: In User Manager for Domains, add groups and group your users according to job function, skill, and security demands. Rather than just an Accounting Users global group, you might have Accounting Users-Novice, Accounting Users-Intermediate, and Accounting Users-Expert groups. Assign the policies and security functions to the global group. Then, when a user advances in skill and reliability, you can move him from one group to another, and he will inherit the policies and security rights from the new group.
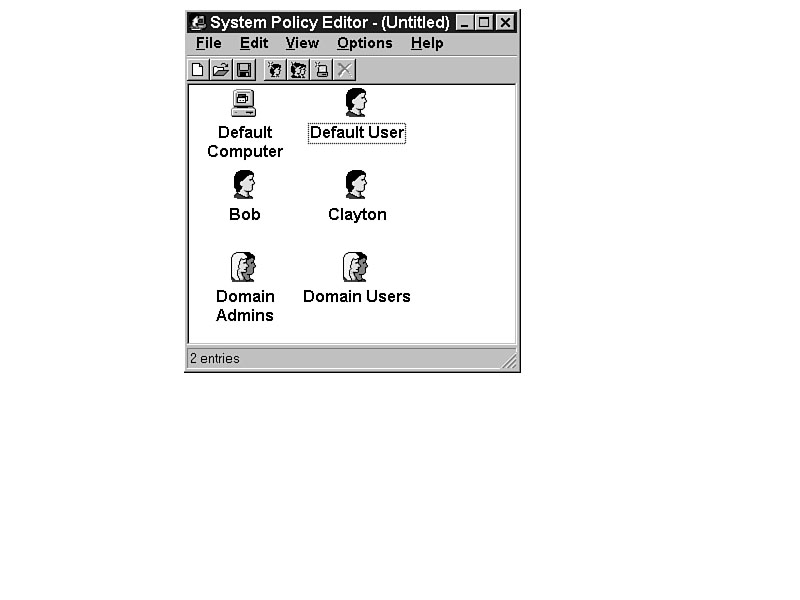
With the individual user and group policies created (as shown in Figure 32.4), you can give each user the specific settings as required, balancing the individuality with administrative shortcuts.
Figure 32.4. Setting policies for users and groups.
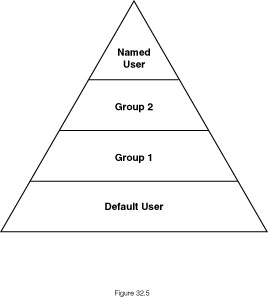
If there are different settings for the default user, the named users, and the groups, there will inevitably be conflict between the policies. To get the exact results you want, you must understand how System Policy Editor resolves these conflicts.
First, the default user policy gets loaded. Then come the group policies in order of priority. Finally, the individual user policy gets loaded, overwriting the Registry changes that have been made. (See Figure 32.5.)
Policy priority is very straightforward, except in the case of multiple groups. If a named user is a member of multiple groups, and each group has a policy, which of the policies takes effect?
Figure 32.5. Priority of user settings in System Policy Editor.
In the example of Figure 32.6, the named user, Jennie, who
is a member of both the
Domain Admins group and the Domain Users group, has a policy that overwrites all
of the others. In that case, the priority of the groups has no effect.
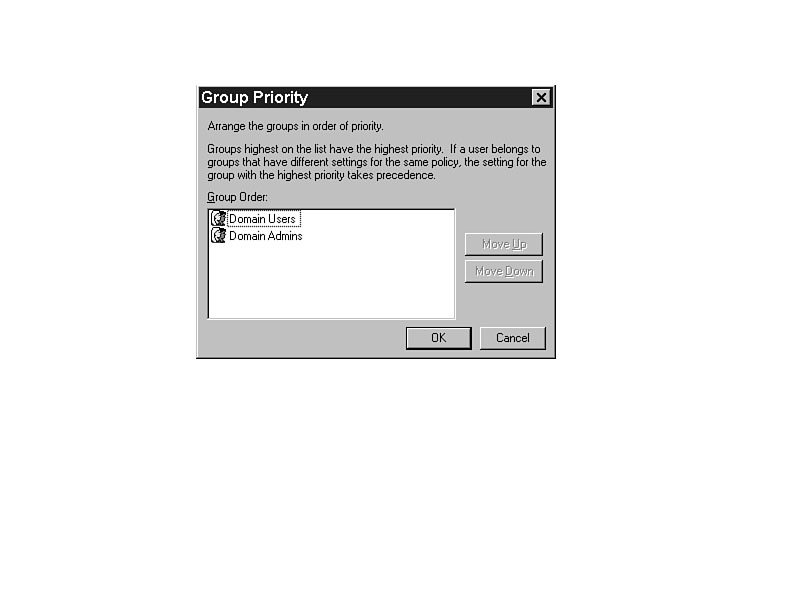
In the example in Figure 32.7, Jennie's policy is to use whatever setting is currently in place. That means that the priority of the groups is critical in determining whether Jennie can edit the Registry. With Jennie in the Domain Admins group, you would assume that she should have that right.
The policy Jennie uses depends on which of the two groups (Domain Admins and Domain Users) has priority. Normally, the Domain Admins group would have priority, but System Policy Editor chooses priority in a different way. It sets priority in the order of creation of the groups in System Policy Editor. If the Domain Users group was created first, it has priority, and Jennie does not get to edit the Registry. Unfortunately, that is not a very good way to determine priority.
Figure 32.6. Multiple policies all affect the user.
Figure 32.7. Group policy priority determines the effect on the user.
To select the priority of group policies, click any group icon, and choose Options | Group Priority. The dialog box shown in Figure 32.8 appears, giving you the option of setting the priority of the groups.
Figure 32.8. Group priority settings in System Policy Editor.
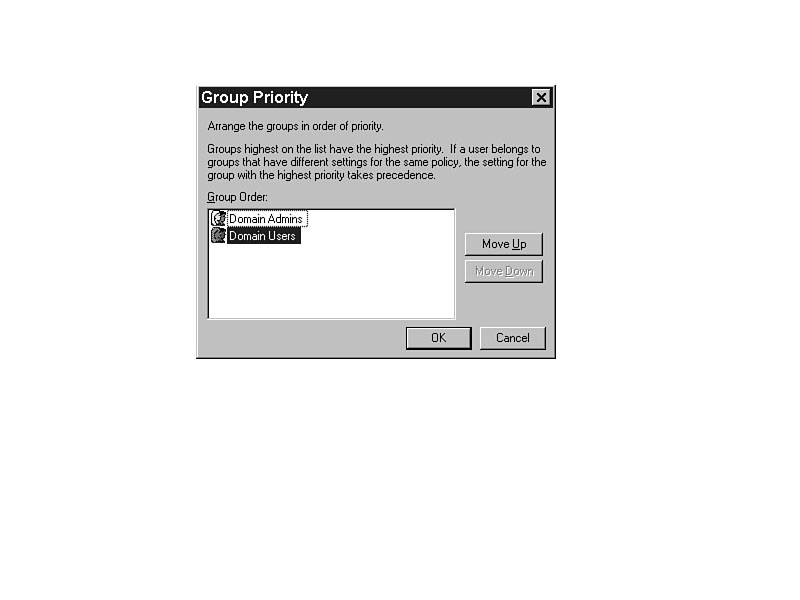
To change the priority, highlight the group and select Move Up or Move Down. When
the order of priority is correct, select OK. The policies will then be implemented
as expected.
With the group policy priority applied as it is in Figure 32.9, Disable Registry editing tools will be turned off, giving Jennie the ability to edit her Registry.
Figure 32.9. Changing the group priority settings.
TIP: Open the policy for Administrator and ensure that the selection is made to allow Administrator to edit the Registry. If Administrator is denied that right, the results could be disastrous. The Administrator would not have the ability to edit the Registry, and would have to restore a backup of the Registry to gain access. Any other settings added since the backup would be lost.
Most of the restrictions for users are in COMMON.ADM and work for both Windows NT and Windows 95. This is because nearly all of them are associated with the Explorer interface. It is also why they do not work with NT 3.5x. Some of the settings are outstanding, but some are just plain silly. Pick and choose carefully.
The settings are listed with the categories, policies, and parts for each separated by a forward slash like so: Network/System Policies Update/Remote Update.
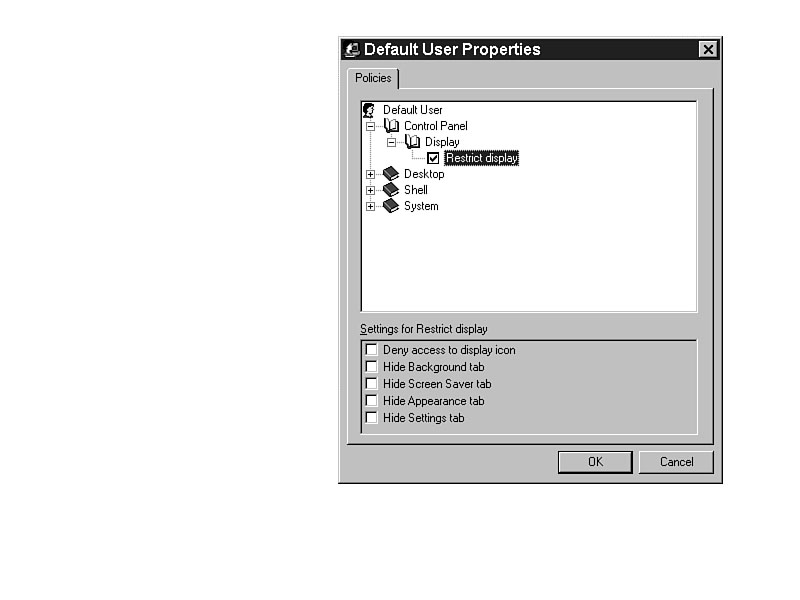
Beginning users should probably be restricted from using the Control Panel | Display function, but it makes sense to restrict only a few others. If you restrict the Control Panel | Display function here, it will still show in the Control Panel folder. However, when you try to access the function, it will not let you. (See Figure 32.10.)
Figure 32.10. Control Panel display restrictions.
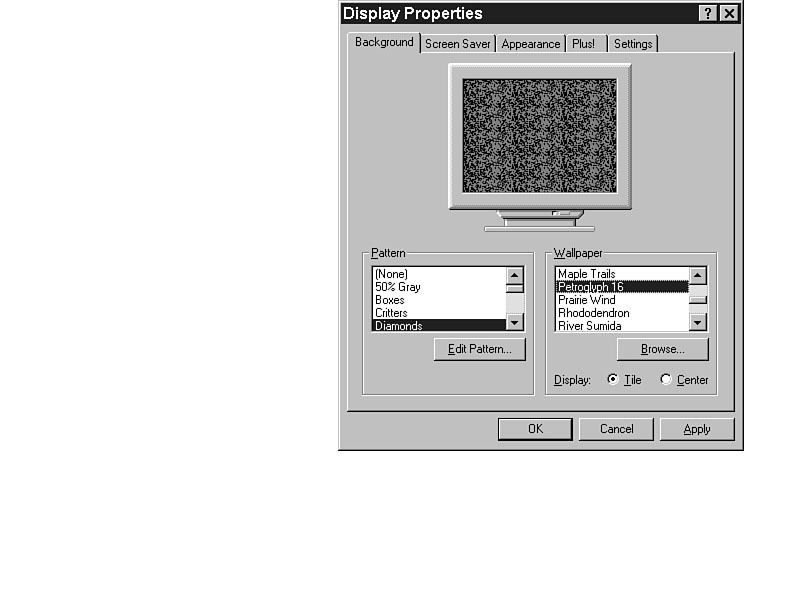
You can restrict the user's use of patterns and wallpapers with the Hide Background tab. The user would have no opportunity then to change the pattern or wallpaper. Figure 32.11 shows the Background tab from Control Panel | Display.
NOTE: I have no idea why Microsoft even bothered with restrictions like Hide Background tab. Pornographic photographs aside, choosing a different pattern or wallpaper has no impact on performance or security.
Figure 32.11. The Background tab in Control Panel | Display.
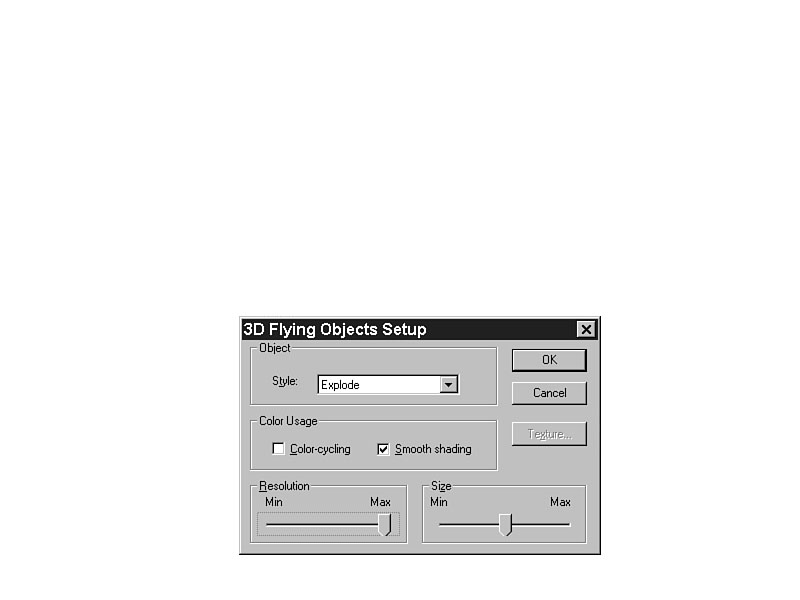
Screen savers seem harmless enough. Unfortunately, if you use one (particularly one of the OpenGL screen savers shown in Figure 32.12), you may use all available CPU time. Access to your computer for file and printer sharing will be horribly slow. So, you should never ever put a screen saver on a server!
TIP: If you want to keep prying eyes away from your system, lock the workstation with Ctrl+Alt+Del, and click the Lock Workstation button. It will require your password or the Administrator to log on to get back, but it requires no CPU time.
Most screen savers in NT use the user's password. If you have a screen saver that uses a different password and the user forgets that password, you will have to restart the system to get back in.
Figure 32.12. Activating an OpenGL screen saver in Control Panel | Display | Screen Saver.
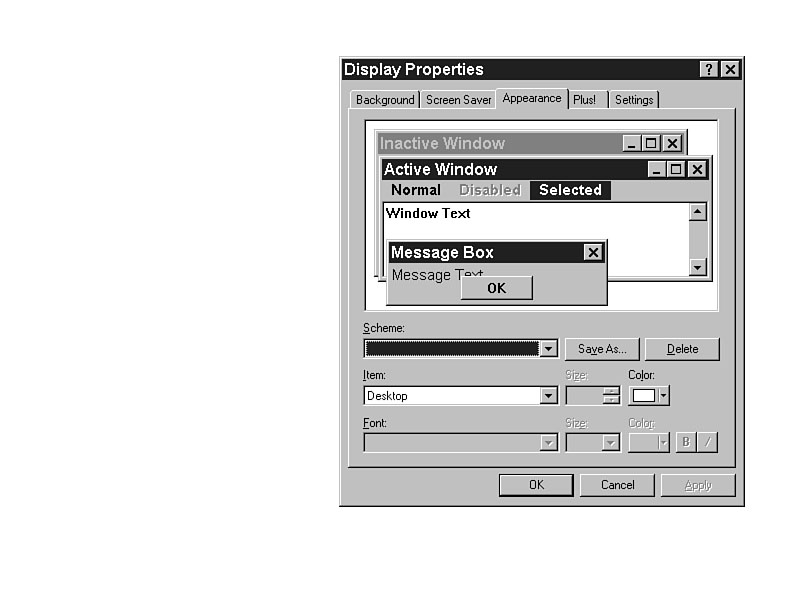
What are you in the mood for today? A purple screen with pink letters? Who cares, as long as you are getting your work done. If you find your chosen colors distracting, change them. If you are obsessive in your desire for control, you can restrict your users with this setting, as shown in Figure 32.13.
Figure 32.13. The Appearance tab in Control Panel | Display.
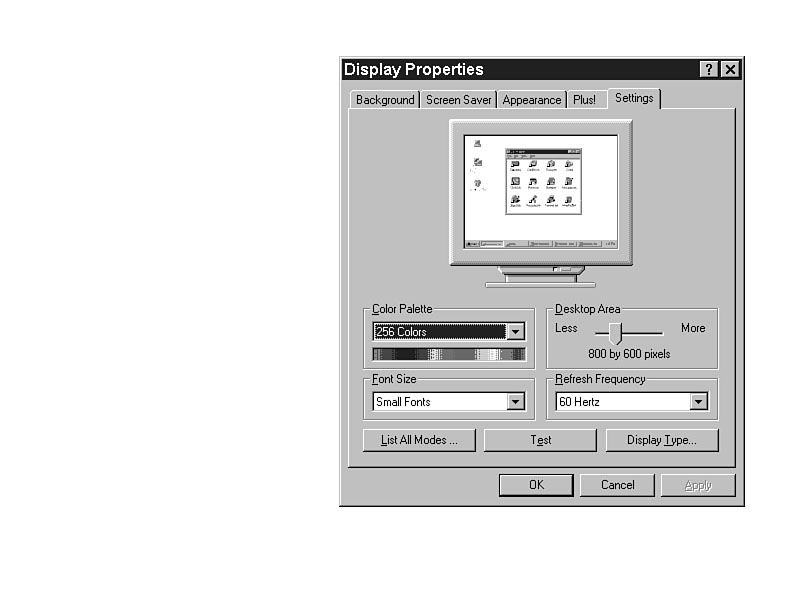
Why would an ordinary user need access to the Settings tab in Control Panel | Display? He doesn't. Access to the Settings tab allows the user to change the screen resolution, the number of colors, and the display driver. If the user tries to change the display driver and sets it incorrectly, you will have to repair it, and in the worst case, you might have to reinstall Windows NT. Absolutely, without question, hide the Settings tab for users who like to tinker with their systems. (See Figure 32.14.)
Figure 32.14. The Settings tab in Control Panel | Display.
If you want your company logo to grace the screens of all the systems in your organization, you can set that with the Wallpaper option (as shown in Figure 32.15). If the user changes the wallpaper during a session, the user's choice will be overridden after he logs off and back on.
Figure 32.15. Desktop settings.
To ensure that everyone has equal access to the wallpaper, put it in the NETLOGON share. Everyone always has access to the NETLOGON share.
Setting the Color Scheme changes all the user's colors on the desktop. It's a fast and easy way to set the colors; simply select from the list of color schemes.
It seems a little too restrictive, forcing a specific color scheme on users. Of course, if you are a practical joker, you could recreate "Hot Dog Stand" and force your co-workers to use it. Simply set it as a policy.
This is an outstanding option. You can effectively curtail the use of outside applications or applications that users should not use by removing the Run command from the Start menu. (See Figure 32.16.)
Figure 32.16. Shell restrictions.
Of
course, applications can still be started from Explorer.
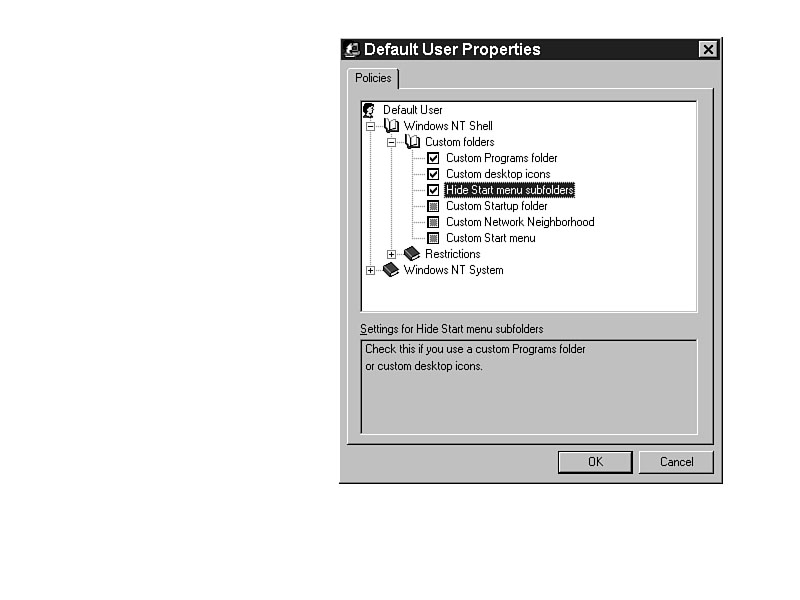
If you don't want your users to change settings on their systems, you can remove all the folders from the Start menu Settings function.
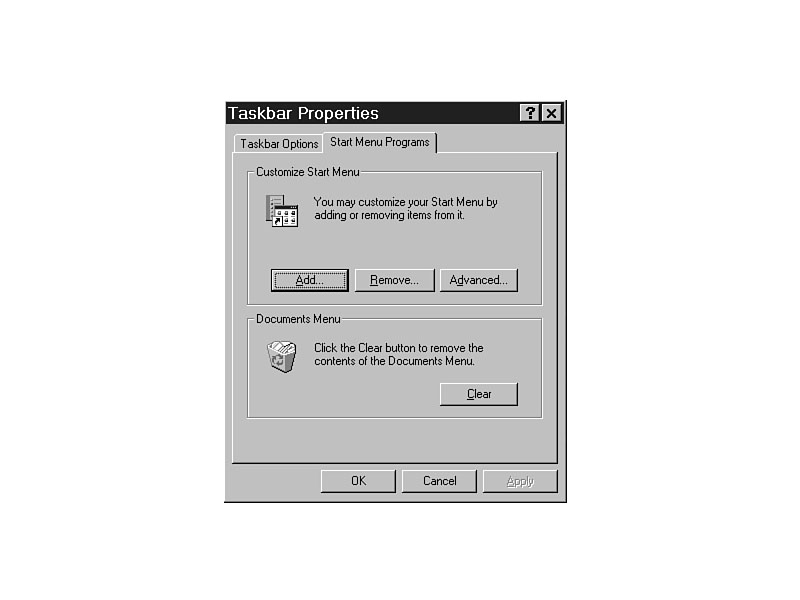
Deny users the ability to change the Taskbar by removing access to it through the settings on the Start menu. (See Figure 32.17.) Doing so restricts the user's ability to change the properties of the Taskbar; the user cannot set the Taskbar to hide, or to always be visible. When access is denied, the user cannot customize the Start menu or remove the contents of the Document menu through Start | Settings.
However, even if this setting is imposed on a user, he can still change the contents of the Start menu and Document menu through Explorer. The Start menu contents are stored in the \WINNT\Profiles\username\Start Menu folder, and the Document menu contents are stored in the \WINNT\Profiles\username\Recent folder.
Figure 32.17. Changing the Start menu with the Taskbar settings.
With access to the Taskbar functions, users can add or
remove items from the Start
menu, and they may lose the ability to easily launch some applications if they delete
the wrong items.
When you remove the Find command from the Start menu, the command is also removed from Explorer. In that case, users cannot browse their own hard disk. If they do not have a shortcut or know exactly where to find the application or data file, they cannot access it without looking in every directory.
Setting this essentially disables My Computer and Explorer. If you can't see any drives or look at any files in My Computer or Explorer, it is pretty tough to use them. Hiding the drives is the only way to restrict access because it is not possible to remove My Computer from the desktop.
The only files that a user can use when this setting is enabled are those that had a shortcut added to the Start menu or desktop or those for which he knows the complete path and filename.
If you have set up logon scripts correctly (using mapped drives for all the connections your user normally needs), the need to browse the network using Network Neighborhood is almost nonexistent. The icon is removed from the desktop and from all Explorer functions, including saving and opening files.
The user can still make all necessary connections; he just cannot browse to do it. That saves a lot of traffic on the network.
If you don't want to remove the whole Network Neighborhood, consider limiting what the user can see. Without the Entire Network icon, the user can only see the computers on his own physical segment. He cannot browse beyond that. He would still have the opportunity to map drives directly, but he would need to know the path.
If some computers are not members of the domain but are still on the physical network, they will show up in the browse list. It's doubtful that any security is attached to their folders or printers. Allowing simple access to those systems may compromise the security of your network. Restricting the user so he must know the name of the system and the name of the share increases security.
The only time it's useful to be able to hide all the items on a desktop is in the case of a single-use, highly public machine. You don't want anyone walking up and messing with the settings on the system, or running anything other than the designated program.
TIP: Want a great April Fool's Day trick? Get a screen shot of Windows NT 3.51 or Windows for Workgroups. Use the setting listed previously to specify it as the wallpaper. Hide all the items on the desktop, and your user will be clicking for days.
With this option enabled, you cannot restart the system or prepare it to be turned off with the software. The only way to protect Windows NT if you use this setting is to ensure that the user cannot get to the power or reset buttons.
WARNING: Windows NT has a specific routine that it uses to prepare files for shutdown. In the case of power failure, reset, or manual power-down, files may be damaged. Windows NT can fix the files, in most cases, but it takes resources and time, potentially hurting performance. You also may lose unsaved data, requiring re-entry.
This outstanding setting changes the way Explorer works. Normally, NT remembers where you put things if you had any system-level programs (like Control Panel or Explorer) open every time you log off. The next time you log on, NT restarts those system-level programs and all of your icons will be where you left them.
If you don't save the settings at exit, NT always retains exactly the same starting point for you. I call it the "maid" feature. When you leave, the maid comes in and cleans up for you.
WARNING: If this setting is not activated and you have Explorer in your Startup group, you may end up with multiple instances of it loading. If you left Explorer open when you logged off, you will have two instances of Explorer when you log on again.
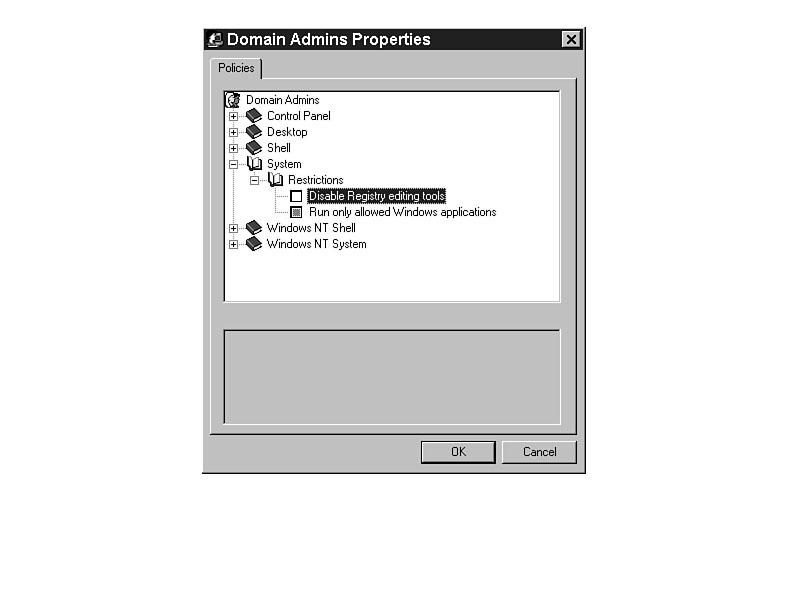
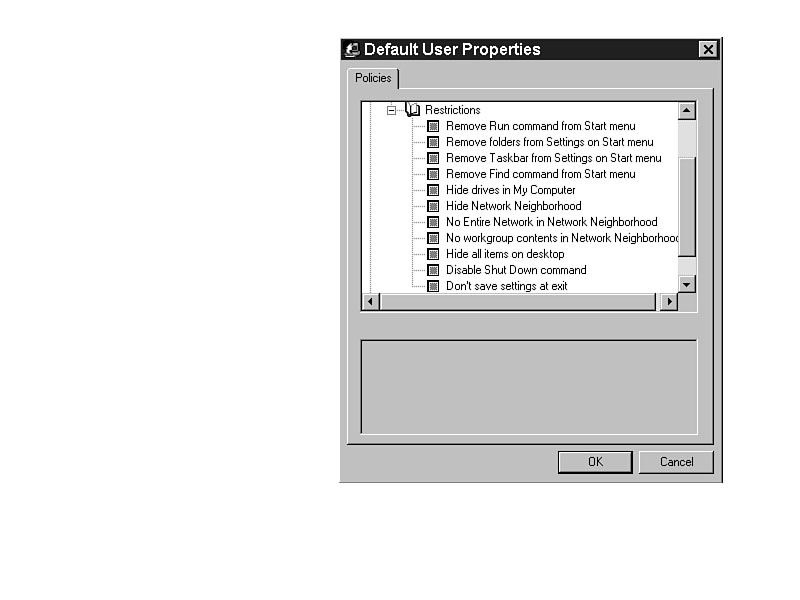
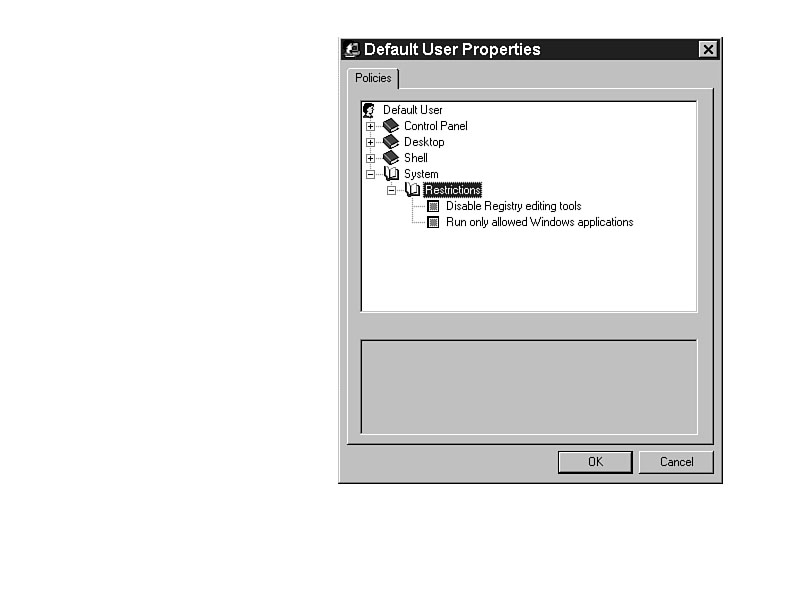
Disabling the use of Registry tools is very important. As mentioned earlier, every user has the ability to edit his own Registry, and some may be able to edit others. Figure 32.18 shows the System Restrictions.
Figure 32.18. System Restrictions in COMMON.ADM.
Setting this option restricts the user from running REGEDT32.EXE or REGEDIT.EXE
regardless of where the file is run. Whether from the Run command, an icon, the DOS
prompt, Explorer, or File Manager,
the user cannot edit the Registry. Even if you
change the name of REGEDT32.EXE or REGEDIT.EXE, the user cannot
activate the file.
WARNING: Even though the user cannot use a manual Registry editing tool, this does not restrict him from running System Policy Editor.
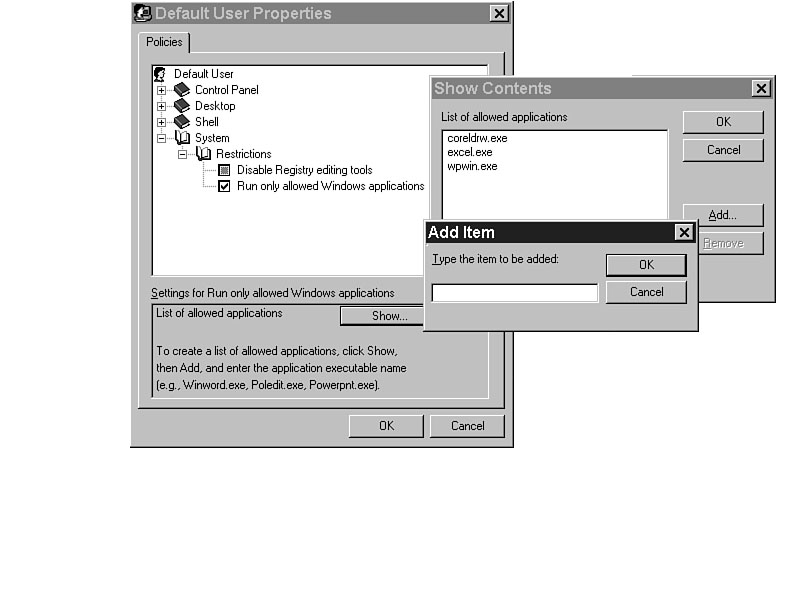
Caution! Caution! Caution! The most restrictive of all policies is the restriction to run only allowed Windows applications.
If you set this policy, the user can only run the actual programs listed in the dialog box as shown in Figure 32.19. To add items to the list, click the Add button and type the name of the application. Do not type the path, just the executable filename. That way, regardless of the location of the file, the program will still run.
Figure 32.19. Sytem restrictions dialog box
Figure 32.20. Setting
the Custom Programs folder.
If the
application is not listed here, it cannot be activated.
TIP: When you use this tip in conjunction with the option to hide all items on the desktop and the option to restrict Start menu items, a public machine can be very secure. For example, a system that runs a time-clock program for all employees could qualify for these settings. A user who has been playing too many games and fiddling too much with NT could be another candidate for the settings. Be very careful, though. It is very easy to over-restrict with this setting. If an application is not listed here, you can't run it.
NOTE: There is no need to worry about complex applications not working correctly if they are listed here. When an application calls another executable, the executable is being called by the system, not by the user. Therefore, the application will still work, even without the additional executable files listed in the dialog box.
Most of the policies for users are found in COMMON.ADM. Many of the ones listed are even similar to the computer-based policies listed in Chapter 31, "Managing Domain Computers with System Policy Editor." The main difference is that these are associated with a user name or group instead of a blanket policy for all users. The real tip-off to that is in the location of the files. In the computer-based policies, the file is set in all users; here, they are set for individual user profiles.
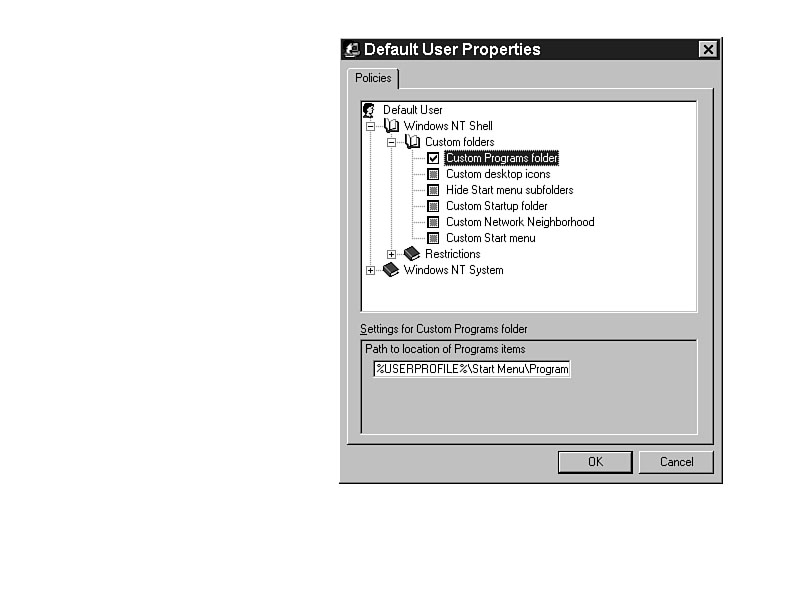
Members of the Accounting group would probably need the same shortcuts available to them. Setting the Custom Programs folder for everyone in the group is the fastest way to accomplish that. (See Figure 32.20.)
Figure 32.20. Setting the Custom Programs folder.
Members of the Accounting group would probably need the same icons available to them. Setting the Custom desktop icons for everyone in the group is the fastest way to accomplish that. (See Figure 32.21.)
Figure 32.21. Setting the Custom desktop icons.
Only shortcuts to applications show in the Start menu. This minimizes clutter and removes most of the pop-up menus that appear. (See Figure 32.22.)
Figure 32.22. Minimizing clutter in the Start menu.
TIP: Everything in the menus in Windows NT is alphabetical. If you want to specify the order of items, you will need to be creative. You may want to put a number in front of the name to specify the order, or you could move the Accounting shortcut to the bottom of the list by renaming the shortcut X-Accounting.
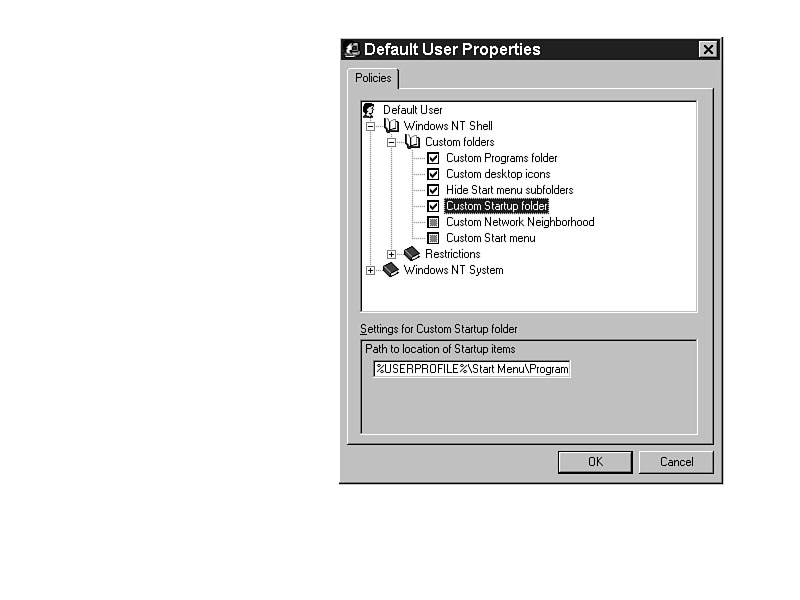
This setting gives you the ability to create a separate startup process for every user. Depending on the user or group, specific applications may be needed every time. This setting allows them to load automatically. (See Figure 32.23.)
Figure 32.23. Creating a separate startup process for every user.
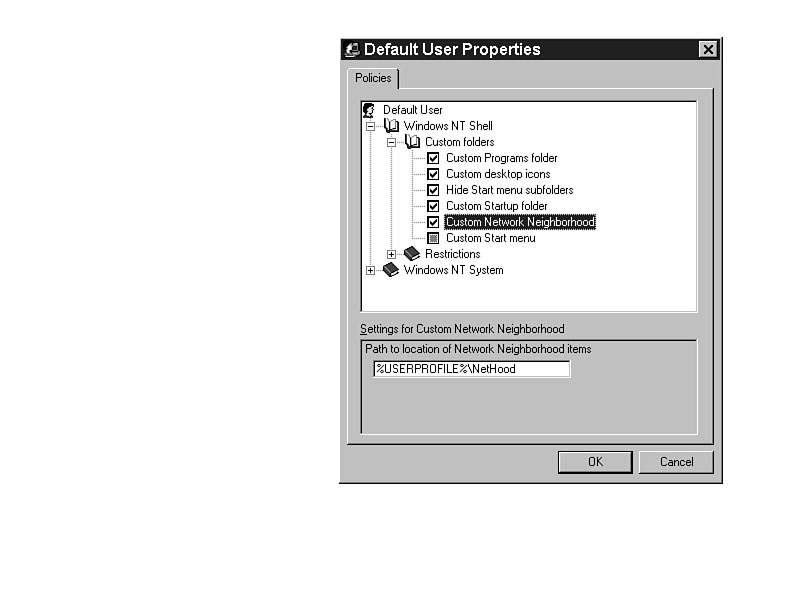
With this tip, you can create a set of shortcuts to shared folders across the network, and use it as your Network Neighborhood. Multiple users can all use the same list, thus improving your performance because shortcuts would already be in place instead of relying on the browser. (See Figure 32.24.)
Figure 32.24. Create a set of shortcuts to shared folders across the network and use it as your Network Neighborhood
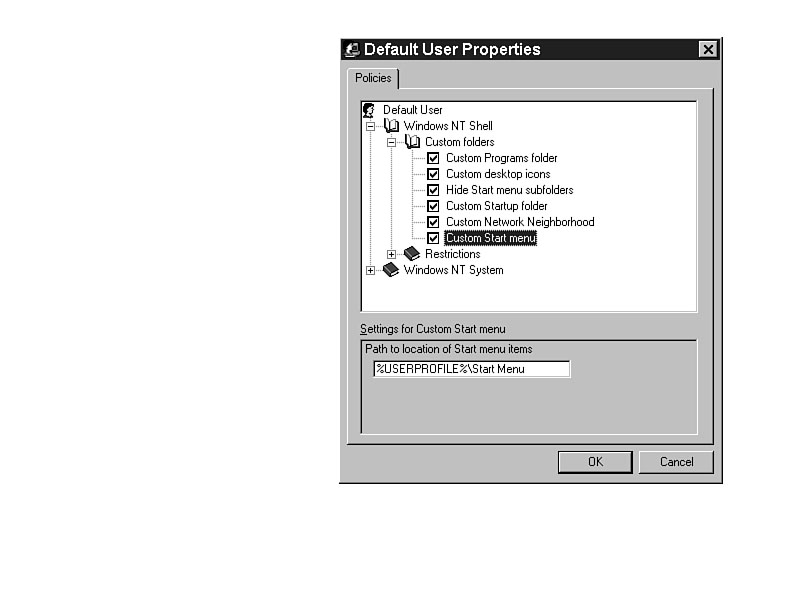
This setting allows you to create a customized Start menu for every user or group, which is simple enough. (See Figure 32.25.)
Figure 32.25. Create a customized Start menu for every user or group.
If this setting is turned on, any files in the folders for menus or the desktop must have an extension listed in HKEY_CLASSES_ROOT for them to be used. Generally, you would only put shortcuts to executable files, batch files, and documents associated with an application there anyway. This setting forces you to do so. (See Figure 32.26.)
Figure 32.26. All files in the folders for menus or the desktop must have an extension listed in HKEY_CLASSES_ROOT.
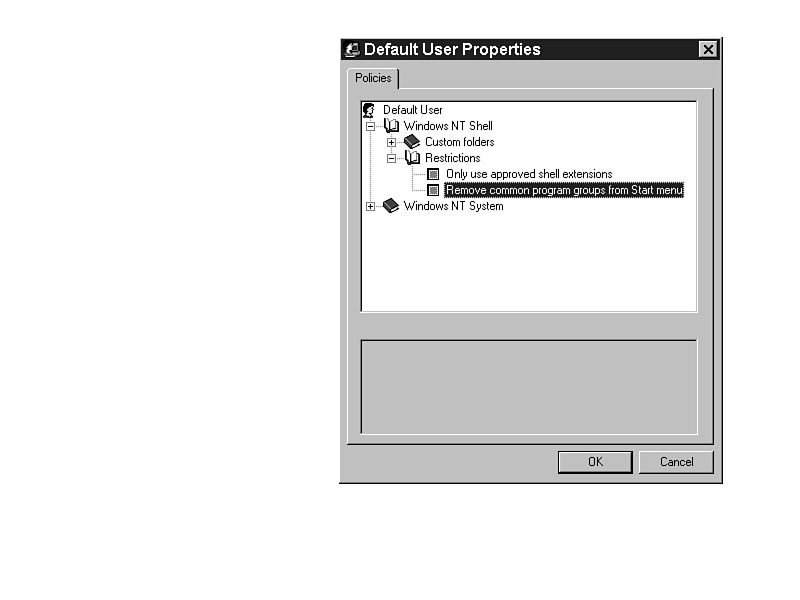
If you remove access to the common program groups from the Start menu, the user cannot be prevented from using the applications that were there. However, they would be required to have another shortcut or find the executable file in Explorer.
WARNING: If you remove access to the common groups, you may lose more than access to administrative programs. Common groups are often created when the application is going to be used by multiple people who use the computer. Add shortcuts to necessary applications to the shell-restriction options, and the users will retain access.
TIP: An alternative to removing access to all the common groups is to simply remove the Administrative Tools folder from the All Users profile. Copy the shortcuts to the profiles where necessary, and then remove the Administrative Tools folder.
Parsing the AUTOEXEC.BAT file removes all unnecessary lines from the system. For example, parsing this file would remove drivers for a CD-ROM drive if NT had drivers that could be used. AUTOEXEC.BAT is parsed when Windows NT is installed, and this may need to be done again if the file gets cluttered with extraneous information. (See Figure 32.27.)
Figure 32.27. Parse AUTOEXEC.BAT to remove unnecessary lines from the system.
The setting in WINNT.ADM activated as a computer-based option in System Policy Editor will override this setting. If you have a particular user who roams the network, and that user has a complex logon script, you may need to order the shell to wait for the logon script to finish before loading.
It is always easier to start with restrictions than impose them later. It is always easier to ease restrictions than tighten them. Start with restrictions, and loosen them as the users prove their abilities. You may even choose to use them as a carrot when training and testing is completed.
TIP: How would you feel if restrictions were to be imposed upon you? That's exactly the way your users feel. Be judicious in your restrictions and follow up with additional training and support. When an irate user calls you about a restriction imposed on him, how you respond determines the rest of the conversation, and possibly the rest of your relationship. Someone may call you, yelling or not, and ask, "Jim can change desktop settings, why can't I?" Respond calmly, without getting angry and without condescending, "What was it that you wanted to do?" and sit back and listen. If it is a valid request, they always tell you. Asking that one simple question always starts a dialog that allows you to discover what the user is thinking, what he really needs, and how you can help him. Talk to your users. Setting restrictions is a training issue. Your users will appreciate your help.
Here are lists of the best and the worst in user settings in System Policy Editor.
The most valuable players in user settings, arranged in order of priority, are as follows:
In the author's opinion, the silliest settings are these:
User settings and restrictions are the most powerful management and training tools I have ever seen. Users who change critical settings incorrectly (whether accidentally or maliciously) hurt the entire organization. The amount of time that is spent fixing silly problems and bailing out users who are technically over their heads is phenomenal. Imagine the increases in productivity if the technical support staff could focus on helping users improve their skills.
System Policy Editor is the tool to change the focus of support in your organization. It will literally change the way you do business.
![]()
![]()
![]()
© Copyright, Macmillan Computer Publishing. All rights reserved.