![]()
![]()
![]()
![]()
You might be wondering what installing software and cloning systems has to do with the Registry. After all, most 32-bit application developers use Registry changes to control the application and its functions. If you were to simply copy the application's files to another system, it probably wouldn't work because the required corresponding Registry changes for the application's initialization and control would not have been implemented.
Say you need to set up 15 new systems for new employees, each system identical, each containing 10 applications. Plus, imagine having to implement the necessary modifications to the Registry for the Explorer interface and security. Setting that up manually would be costly in terms of time and productivity. Allowing users to install NT and applications for you wastes their productive time and leads to installation errors. Cloning is the answer.
The goal of cloning is to create a system that duplicates another, with all its interface changes, tweaks, installed software, and options, and to do it with these caveats:
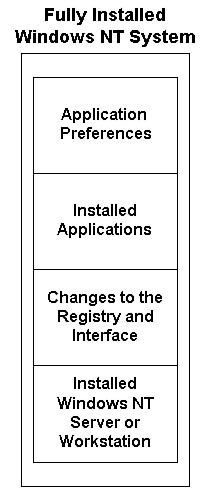
The best option is to take a currently setup system, get everything exactly as you would like it, and clone it (except for the SIDs discussed previously). Then you could use that procedure over and over to make your installation work more easily, faster, and error-free. What you want to achieve is shown in Figure 35.1.
In the past, Computer Profile Setup was included with the Windows NT 3.51 Resource Kit. Unfortunately, even though it did a passable job, it had too many limitations, particularly in relation to long filenames and hardware differences. It was difficult to use, and didn't always create unique SIDs for the systems. The complexity and undependable results made it unusable for most organizations. Now, however, SYSDIFF.EXE is available to help you clone your system.
Figure 35.1. A fully installed system.
NT 4.0 Server offers a new deployment tool called SYSDIFF.EXE, which is designed to allow quick and easy system cloning. SYSDIFF.EXE does not install or help install the operating system--just all of the modifications, applications, and changes. It can help make the necessary interface changes and connections to the network and shares. It can also help install the application files and implement the necessary Registry changes associated with those files.
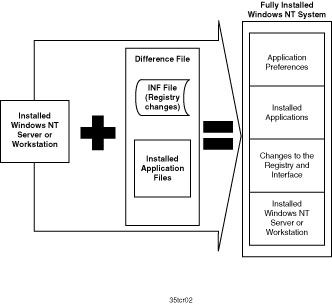
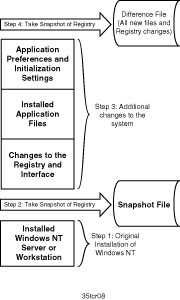
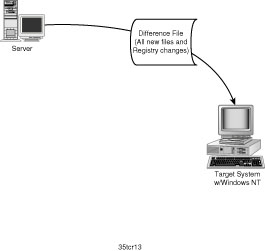
SYSDIFF.EXE allows you to perform these tasks in two ways. You can combine the changes to the Registry with the binary files required to run the applications into one item called a difference file (it is the difference between the original system and the system after all modifications), then copy the difference file to the new system. That process is outlined in the section titled "Cloning Step by Step." An illustration of this method is shown in Figure 35.2.
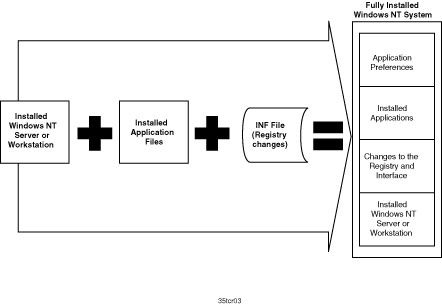
Alternatively, you can use the cloning tool to make only Registry changes, which will create an .INF file. You then copy the actual files another way, by performing a backup-and-restore or by recording the files on a CD-recordable drive, and copy them to the target system. That option is outlined in the section titled "An Alternative Procedure for Installing Files on the Target System." Figure 35.3 illustrates this type of installation. Whether you include all the actual programs and auxiliary files or not, when you decide to clone your system, the most critical part is the Registry.
Figure 35.2. Easy installation with a difference file.
Figure 35.3. Using separate application and .INF files for a clone installation.
NOTE: The .INF file includes only the Registry changes that were made. Separating the .INF file from the difference file will be discussed later.
SOLUTIONS: Why not just use something like GHOST, a third-party product? GHOST is a very good program, and it does cloning very well on systems like Windows 3.x and Windows 95. The limitations of the product make it more of a challenge working with NT, and it does not have as many options as the tools in this chapter do. The biggest limitation is the requirement to have unique computer names and IP addresses, plus the possibility of differences in hardware, drivers, and settings. All of those are compensated for with the Setup Manager.
For SYSDIFF.EXE to work correctly, several things are required, including
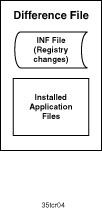
Figure 35.4. The difference file includes the Registry changes and the application files.
If any of these parts are missing, preparing and implementing the clone installations
will not work.
Follow these steps for fast, error-free cloning of Windows NT systems:
TIP: Run the SYSDIFF.EXE application from the server's shared directory. Store the snapshot and difference files in this directory as well. You might get a little more performance by running SYSDIFF.EXE from your local drive, but it requires more manual copying of files.
WARNING: Putting the difference file on your local drive on the master system may cause SYSDIFF.EXE to create a monstrous file, or even hang the process. It may get caught in a loop, trying to copy the file it is copying to. To use your local drive for the storage of the difference file for more performance, add the path where it will be stored to the SYSDIFF.INF file under the [ExcludeDirectoryTrees] section. SYSDIFF.EXE will ignore and exclude it from the snapshot and differ-ence file.
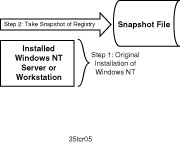
Figure 35.5. Creating the snapshot file.
NOTE: You can also use the procedures listed here to add software to an installed system. When you run the snapshot, it takes a current picture. From that point on, adding other items produces a difference file.
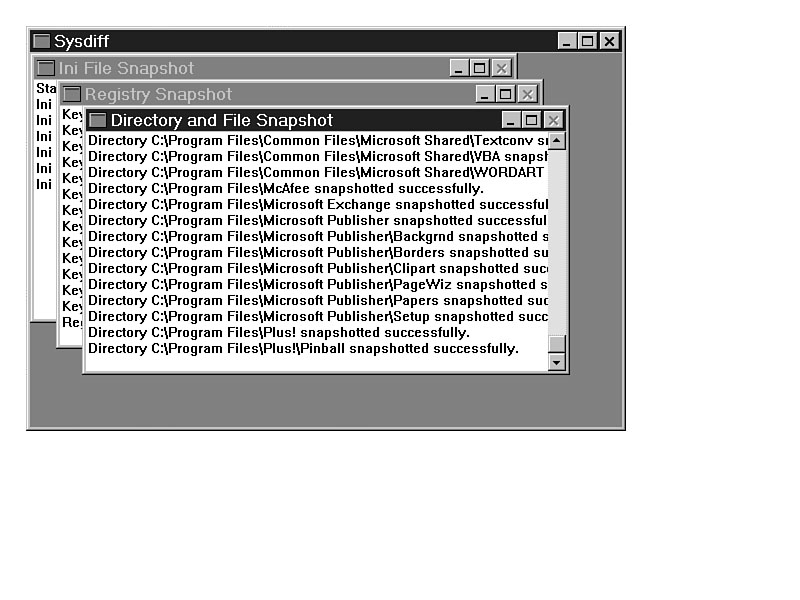
Figure 35.6. The snapshot procedure in progress.
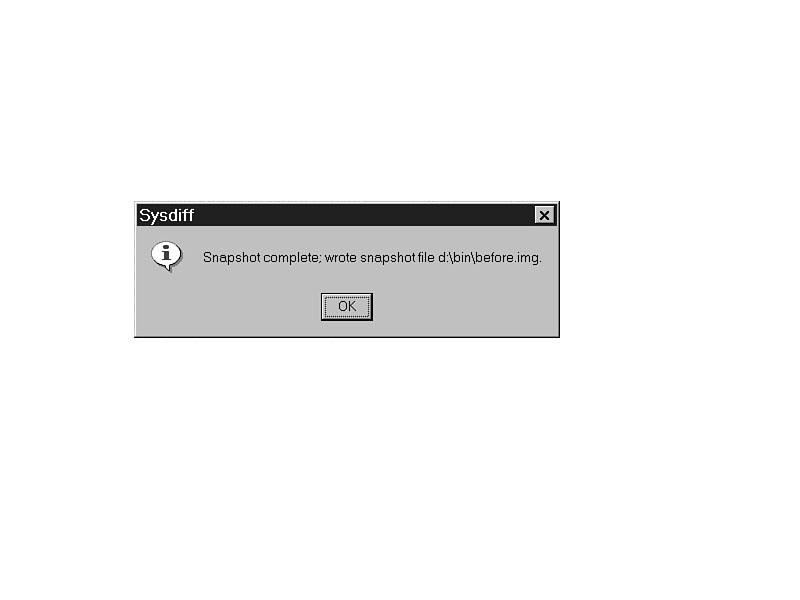
Figure 35.7. The snapshot is finished, and the file is written to disk.
WARNING: Before running the next step to create the difference file, restart the system to ensure all functions relating to the application installation are completed and all files have been closed.
Figure 35.8.The difference file compares the original snapshot to the current installation.
NOTE: For the results shown in Figure 35.9, I took a snapshot of my current system (three hard drives, 2.2GB total space with 220MB free), and the snapshot file was 4.5MB. Then I added a program that used 8.25MB of space. When the difference file was created, it was 7.5MB, indicating significant compression in the writing of the difference file to disk.
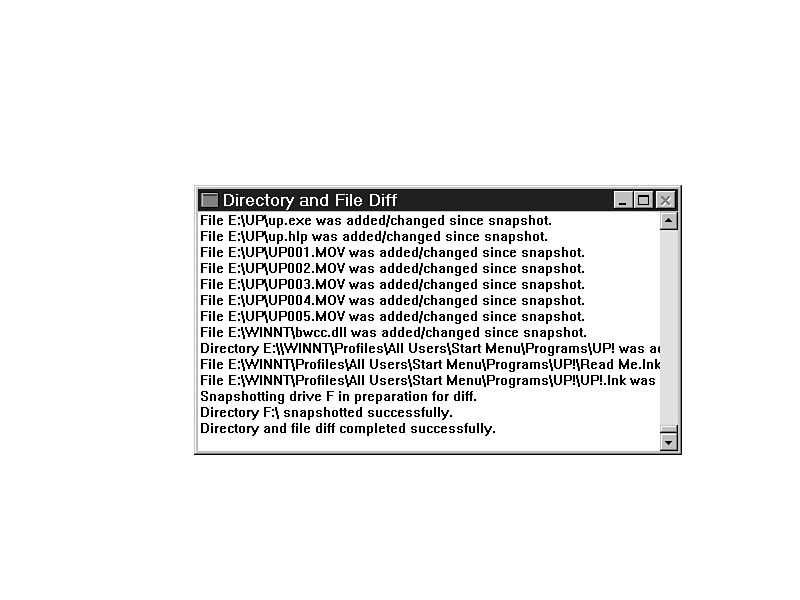
Figure 35.9. The directories and files are examined and compared against the original snapshot file.
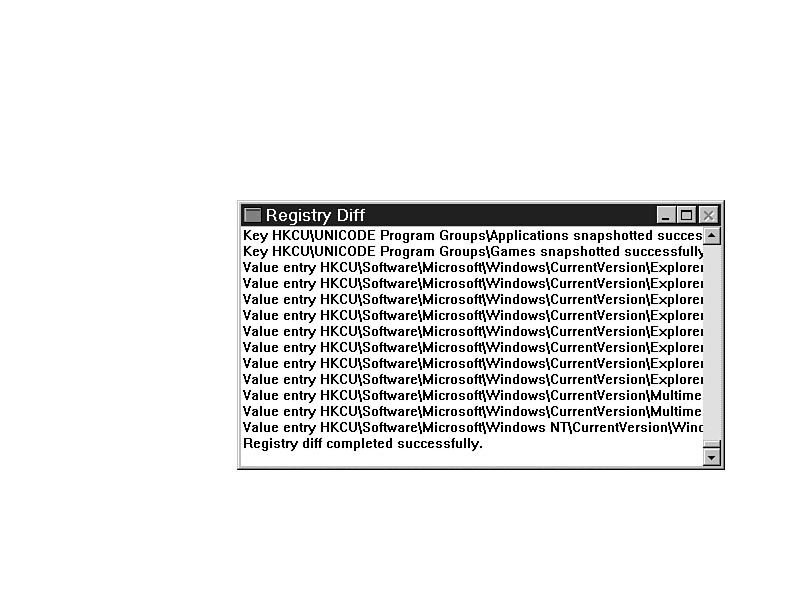
Figure 35.10. The current Registry is compared with the past Registry and differences noted.
Figure 35.11. .INI files are compared for differences from the original .INI files.
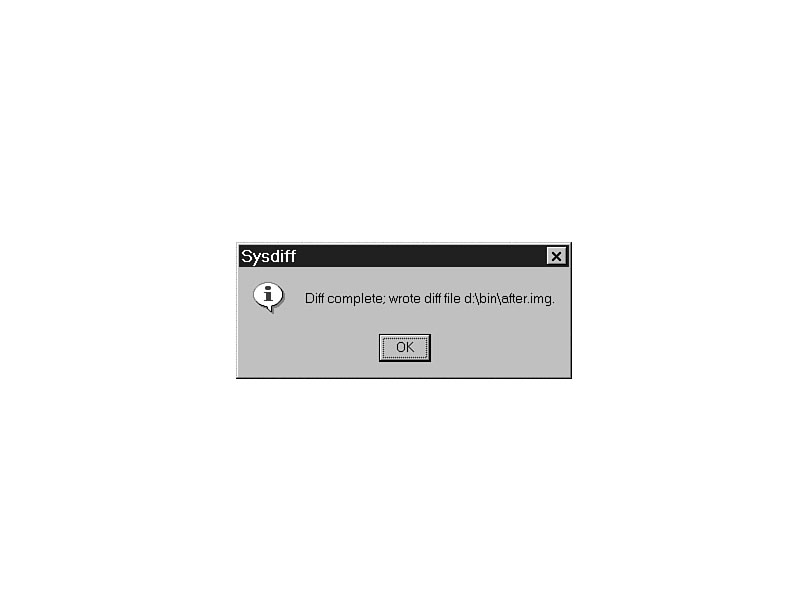
Figure 35.12. After the differences are calculated, they are written to the hard disk.
WARNING: Windows NT must be in the same directory for all systems receiving the difference file.
Figure 35.13. Using the difference file to update the target systems.
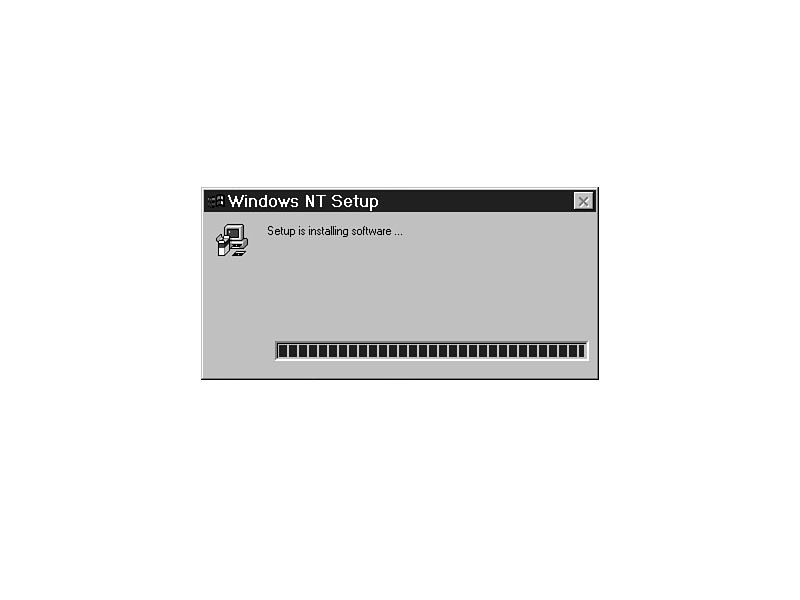
Figure 35.14. The /APPLY option installs the applications on the new system using the Setup function.
As soon as you get one system started in the cloning process, you can start another.
Windows NT networking allows multiple systems to access the same file. The only
disadvantage
to having multiple systems access the server is the amount of traffic each system
generates.
TIP: At this point, you can apply the difference file to as many systems at one time as you can connect to the network. However, test it on one first to ensure that the procedure works exactly as planned. Then, attach to the network and clone away.
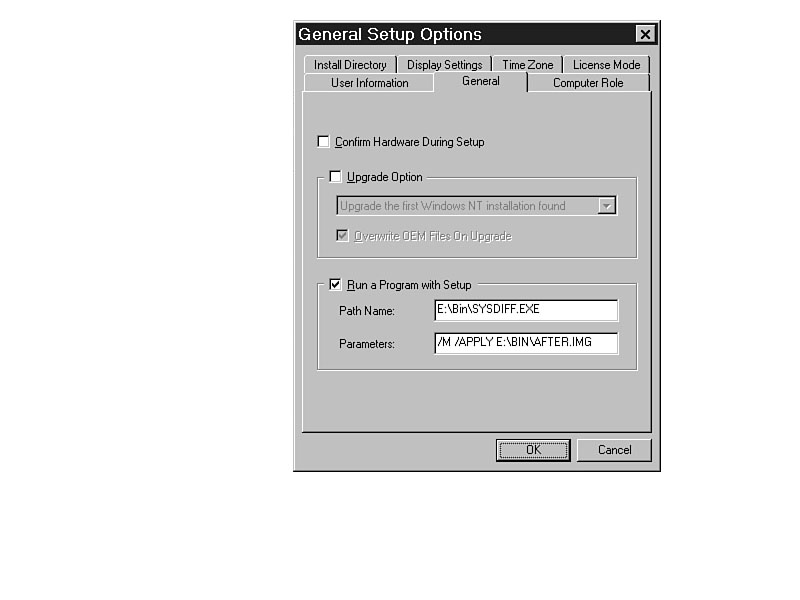
A great shortcut to increase performance when working with cloning is to combine the installation process and the cloning process into one command by using SYSDIFF.EXE. The entire process is controlled by the answer file created by SETUPMGR.EXE, as shown in Figure 35.15, for unattended installation. Using SETUPMGR.EXE to create a text file with all the answers you normally have to give during the Windows NT installation routine can be a great time-saver.
Figure 35.15. The unattended answer file launches SYSDIFF.EXE to complete the installation.
With all the setup information you supply to SETUPMGR.EXE, plus the difference
file you created, you will have the necessary files to help you do a complete
installation
with NT, services, applications, Registry settings, and all preferences set. After
you boot the system and use a client to connect to the server, start the installation
of NT and the difference file. The
command line you use,
assuming you named the answer file UNATTEND.TXT in
E:\BIN, is
WINNT /U:E:\BIN\UNATTEND.TXT.
The SYSDIFF process is controlled by the SYSDIFF.INF file included with SYSDIFF.EXE on the CD-ROM. By editing the SYSDIFF.INF file, you can make the cloning process smoother, faster, and more space-efficient. The SYSDIFF.INF file is basically an inclusion/exclusion file that determines what will or will not be reviewed.
The file on the CD-ROM has nine sections:
[Version]
[ExcludeDrives]
[ExcludeDirectoryTrees]
[ExcludeSingleDirectories]

[ExcludeFiles]
[IncludeFilesInDir]
[ExcludeRegistryKeys]
[ExcludeRegistryTrees]
[ExcludeRegistryValues]
Entries in the SYSDIFF.INF file (as long as the file is in the same directory as SYSDIFF.EXE) will direct the cloning process. For example, if you chose to add the drive letter "E" to the [ExcludeDrives] section, it would not even look there for the snapshot or the difference file. That could save a lot of time in the process if there was nothing there to be used.
Be very careful about removing any of the default entries in the SYSDIFF.INF file. Doing so may make the cloning process unsuccessful.
The difference file contains all the Registry changes, the .INI file
changes, and the actual files that are new since the first snapshot. One of the side
effects of using
SYSDIFF.EXE and the difference file to install applications
is that files inherit the date of the installation instead of retaining their original
date when they are written to the hard drive, as shown in Figure 35.16.
Figure 35.16.
The file dates reflect the date they were installed
with SYSDIFF.EXE.
Alternatively, you can
split the Registry and .INI file changes from the
files and copy the files another way to retain the original dates of the files.
To use this alternate procedure, perform steps 1 through 11 to create the difference file and prepare the target system for file installation. Instead of using the difference file to install the software, split the file between the .INF file (which will update Registry and .INI files) and the actual program and data files.
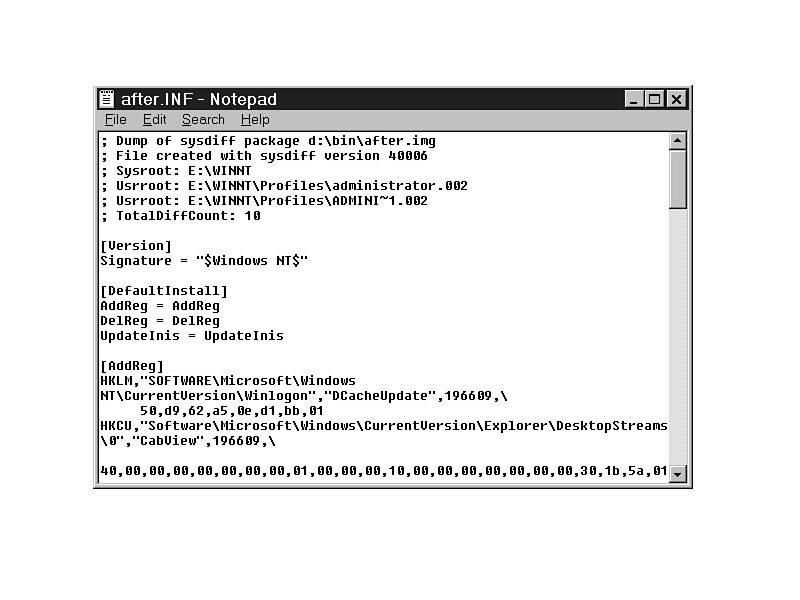
To create the .INF file, use the Start | Run function and type D:\Bin\SYSDIFF.EXE /inf d:\bin\after.img d:\bin2. D:\bin\after.img is the path and name of the difference file, and d:\bin2 is the location for the .INF file and the changes to the system.
The .INF file is given the same name as the difference file, except that the .INF file has an .INF extension (in this case, AFTER.INF). The contents of the .INF file are readable in Notepad or in any other text editor or word processor, and are shown in Figure 35.17.
Figure 35.17. Text listing of the .INF file.
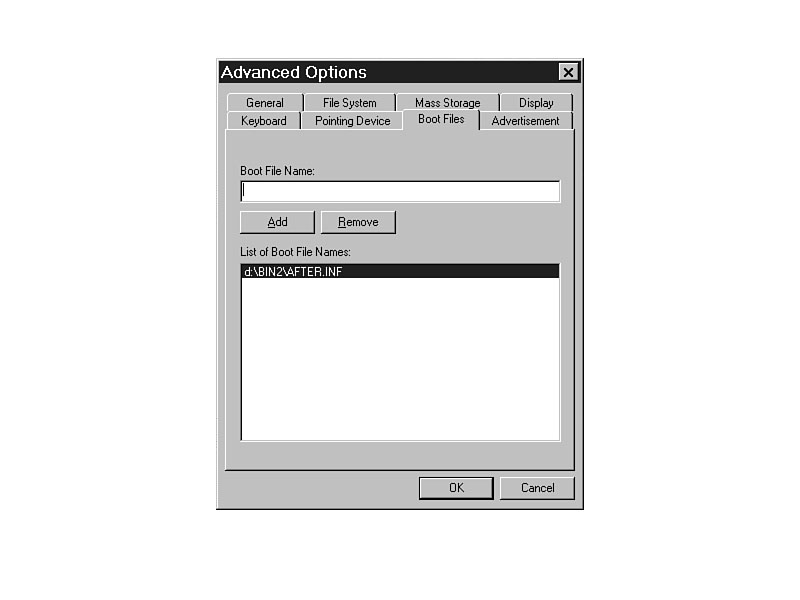
Make changes to Registry and .INI files on the target system by adding the .INF file to the list of files to use at installation. SETUPMGR.EXE has an easy way of including it, as shown in Figure 35.18. Start SETUPMGR.EXE and choose Advanced Options. Select the Boot Files tab. Add the path and name of the file. When Windows NT is installed using the answer file, the Registry and .INI file changes are made automatically.
Figure 35.18. Adding the .INF file to the answer file in SETUPMGR.EXE.
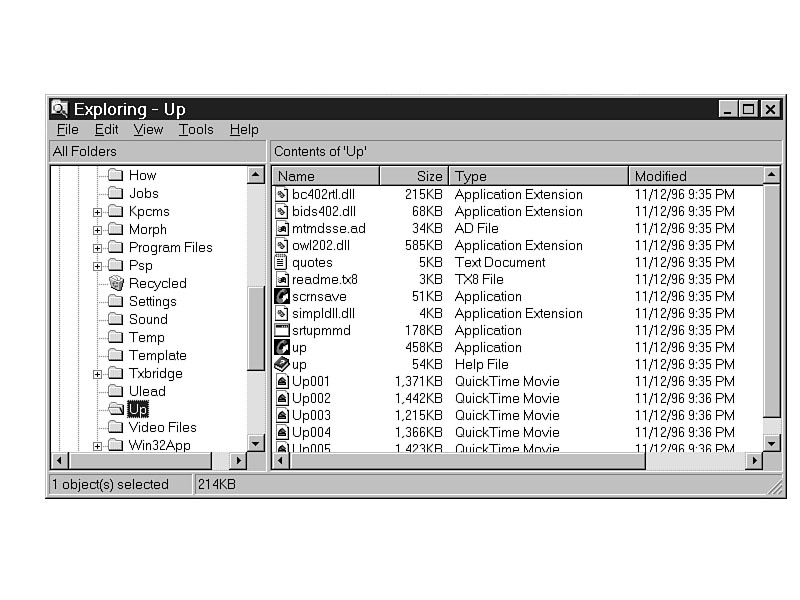
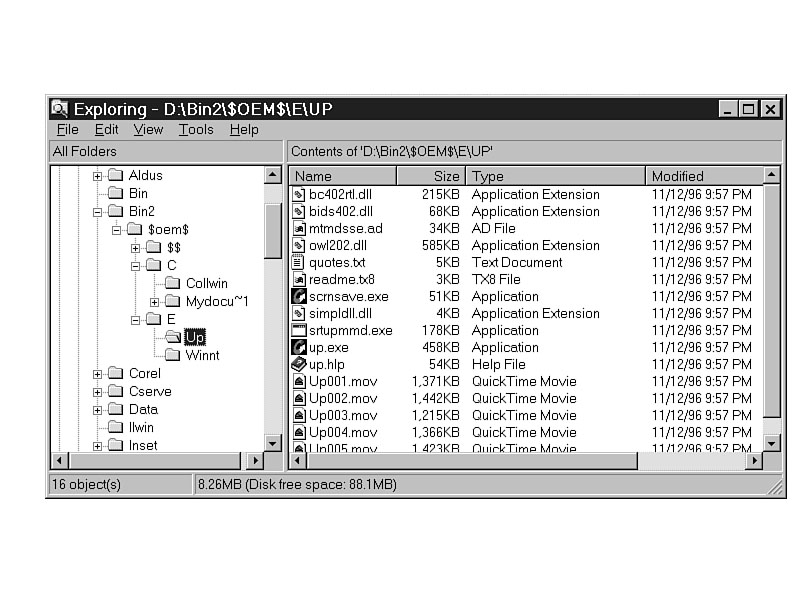
For your convenience, the .INF file-creation procedure also copies all files included in the difference file into subdirectories (as shown in Figure 35.19). When the files are copied into the $OEM$ subdirectory, the date on the files changes to the current date. Using the files in the $OEM$ directory may compromise your security if you are using any date-stamping for your files.
Even though the files have been copied into the $OEM$ directory, you don't need to include them in the installation process. Instead of copying and using the files in the $OEM$ directory, install NT with an answer file, then copy the originals with XCOPY.EXE, and the dates and times will be preserved.
Figure 35.19. All files from the difference file are copied into directory structures for easy copying to the target system.
The .INF file can also be used in the event of a Registry problem with an application. Normally, you would need to reinstall, then make the necessary changes to the menus, toolbars, and preferences. However, if you could have a list of every change the installation and modification made to the Registry and .INI files, it would save a tremendous amount of time.
If you create a difference file after you install an application, you have the information you need. Create a loadable .INF file from the difference file. With that file, you can repair the Registry. If the application's Registry entries become corrupted, load the .INF file back into the system.
Instead of reinstalling the current Windows NT, choose to do an update, including the .INF file in the Advanced Options | Boot Files section of SETUPMGR.EXE. The Registry will be updated with the .INF file information.
Of course, something could go wrong, and, unfortunately, there is very little documentation on this process. Here are some of the more common problems and their solutions.
This will usually happen because of a lack of disk space or there is a problem with the difference file (either corrupted, or a part of the application or data files is bad). Check for disk space on the target system (where the applications will go). If it is insufficient, you will have this problem. If there is plenty of disk space, try manually installing the difference file from the local system instead of across the network. If that doesn't work, re-create the difference file.
When SYSDIFF.EXE attempts to enter restricted areas of the Registry, you may get this message. Edit the SYSDIFF.INF file to exclude sections of the Registry that are off limits.
This is a syntax error on the command line when the /DIFF option is used. Check the step-by-step instructions and try again.
Error 32 indicates an open file error. The files could be open because applications are in use, or the system has opened other applications.
When you create one image in the installation location with the SYSDIFF /INF option, and then run the function again to add another difference file to it, you may get this error.
The easiest way to get around the problem is to use the first image crated with
the SYSDIFF
/INF option for the installation, and apply the second difference file manually
with the SYSDIFF /APPLY
option.
Use SYSDIFF.EXE to update the Registry during installation. It will greatly enhance your installation and cloning procedures, plus give you opportunities to create loadable .INF files for Registry repair.
![]()
![]()
![]()
© Copyright, Macmillan Computer Publishing. All rights reserved.