![]()
![]()
![]()
![]()
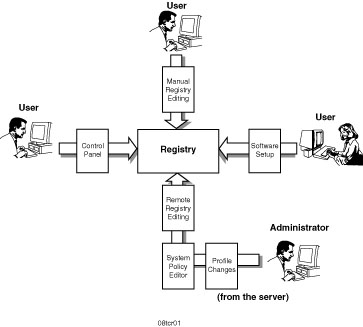
Instead of being a static file that never changes, the Registry is always changing. Although this constant change requires you to properly back up your system, it also allows you to have systems that react (at least somewhat) to your wishes instead of forcing you to change. Windows 95 systems check the hardware configuration every time they boot. Plug and Play functions then automatically set configuration settings in the Registry for every device. Unlike Windows 95, Windows NT does not support Plug and Play hardware configuration, except for PCI devices. All other device settings in Windows NT must conform to the actual hardware settings. Even so, the changes that the Registry undergoes are significant.
Most users will never use an editor to change the Registry, so for the system to react to the user, it must be changed in other ways. Actually, you should be glad that users don't normally make edit changes. Edit changes by nontechnical, untrained personnel frequently end up in error.
Other than manual changes, most changes made to the Registry are made from three different actions:
Figure 8.1 illustrates many of the ways in which the Registry can be changed.
Figure 8.1. Changes to the Registry are made in many ways.
How to go about directly editing the Registry is covered in Chapters 9 through 11.
Every change made in the Control Panel has a corresponding entry in the Registry. Making changes in the Control Panel applets is easier than manually editing the Registry because of the graphical nature of the programs, and results in fewer mistakes as well as fewer Registry problems.
TIP: Whenever possible, make changes to the local system with the Control Panel to reduce errors and administrative overhead.
Tables 8.1-8.3 list the applets in the Control Panel and the corresponding key
that is affected by changes made in each of the
applets. When changes to the configuration
information managed by an applet affect more than one key, Multiple locations
is listed.
Table 8.1. Control Panel applets and corresponding Registry keys available in both
Windows
NT and Windows 95.
| Control Panel Applet | Associated Registry Key |
| Add/Remove Software | HKEY_CURRENT_USER\Console\Application Console |
| Date/Time | HKEY_LOCAL_MACHINE\System\CurrentControlSet\ Control\TimeZoneInformation |
| Display (User settings) | HKEY_CURRENT_USER\Control Panel\Desktop |
| Display (Computer settings) | HKEY_LOCAL_MACHINE\Hardware\ResourceMap\Video |
| Find Fast | HKEY_LOCAL_MACHINE\Software\Microsoft\Shared Tools\Find Fast |
| Fonts | HKEY_LOCAL_MACHINE\Software\Microsoft\Windows NT\ CurrentVersion\Fonts |
| Internet | HKEY_LOCAL_MACHINE\Software\Microsoft\Windows\ CurrentVersion\Internet Settings |
| Keyboard | HKEY_CURRENT_USER\Control Panel\Desktop |
| Multiple locations | |
| Modems | HKEY_LOCAL_MACHINE\Software\Microsoft\Windows\ CurrentVersion\Unimodem |
| Mouse | HKEY_CURRENT_USER\Control Panel\Mouse |
| Multimedia | HKEY_LOCAL_MACHINE\Software\Microsoft\Multimedia |
| Network | Multiple locations |
| Ports | HKEY_LOCAL_MACHINE\Hardware\ResourceMap |
| Printers | HKEY_CURRENT_USER\Printers |
| Regional Settings | HKEY_CURRENT_USER\Control Panel\International |
| Sounds | HKEY_CURRENT_USER\AppEvent\Schemes\Apps\Default |
| System | Multiple locations |
| Control Panel Applet | Associated Registry Key |
| Accessibility Options | HKEY_CURRENT_USER\Control Panel\Accessibility |
| Devices | KEY_LOCAL_MACHINE\System\CurrentControlSet\Services |
| PC Card | HKEY_LOCAL_MACHINE\Hardware\Description\System\ PCMCIA PCCARDs |
| SCSI Adapters | HKEY_LOCAL_MACHINE\Hardware\ResourceMap\ScsiAdapter |
| Server | Multiple locations |
| Services | KEY_LOCAL_MACHINE\System\CurrentControlSet\Services |
| Tape Devices | HKEY_LOCAL_MACHINE\Hardware\ResourceMap\OtherDrivers\ TapeDevices |
| Telephony | HKEY_LOCAL_MACHINE\Software\Microsoft\Windows\ CurrentVersion\Telephony |
| UPS | HKEY_LOCAL_MACHINE\System\CurrentControlSet\Service\UPS |
| Control Panel Applet | Associated Registry Key |
| Add New Hardware | HKEY_CURRENT_USER\Control |
| Desktop Themes (Plus Pack) | HKEY_CURRENT_USER\Software\Microsoft\Plus!\Themes |
| Joystick | KEY_LOCAL_MACHINE\System\CurrentControlSet\Control\ MediaProperties\PrivateProperties\Joystick |
| Passwords | KEY_LOCAL_MACHINE\System\CurrentControlSet\Control\ PwdProvider\MSNP32 |
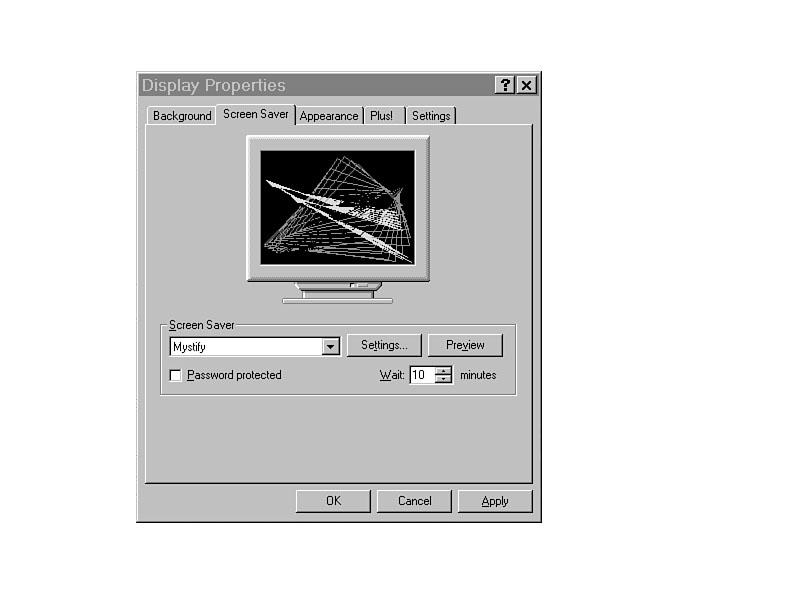
To illustrate the changes that are made to the Registry, you will change the Screen Saver in the Control Panel's Display applet. The initial dialog of this applet is shown in Figure 8.2.
Figure 8.2. Changing the screen saver in the Control Panel.
The Control Panel gives you the option of choosing your screen saver from a list.
The name and details are entered into the Registry in HKEY_CURRENT_USER\Control
Panel\Desktop. The values affected
are the name (SCRNSAVE.EXE), the
on/off status (ScreenSaveActive), and the number of seconds until it is
activated (ScreenSaveTimeout). Additionally, if you want to require the
use of your password to reenter the system,
another on/off change is made (ScreenSaverIsSecure).
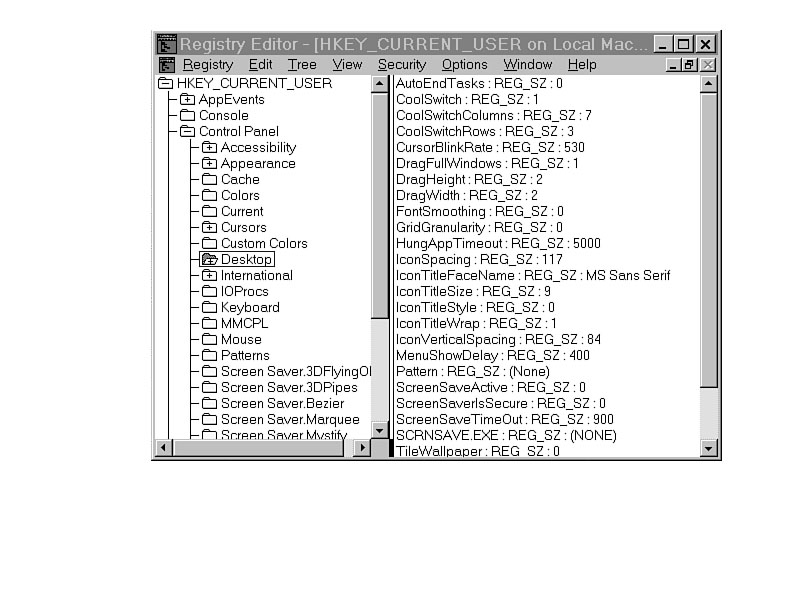
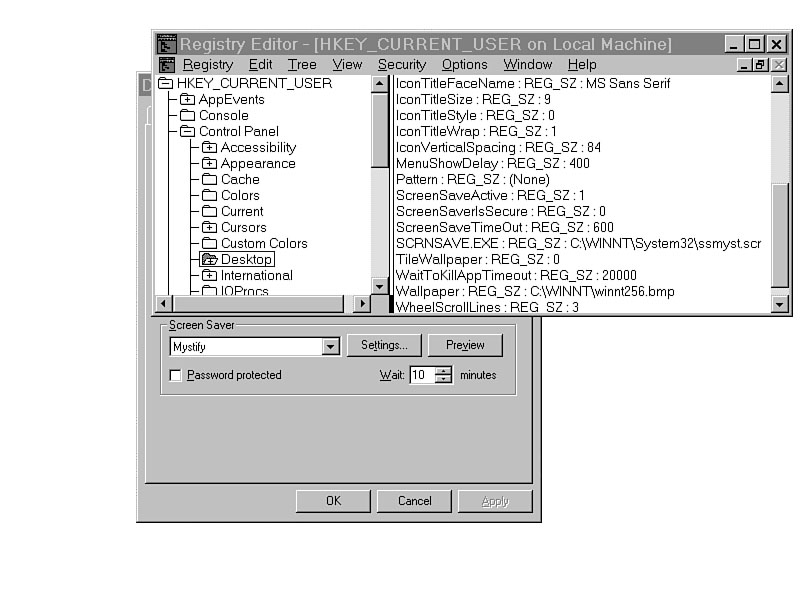
The unchanged Registry is shown in Figure 8.3. After the changes are made in the Control Panel, they show up in the Registry. The changes are immediate and permanent. Although it might not take effect until the next logon, they are made immediately to the Registry. You can change them back, but there is no undo feature. The changed Registry is shown in Figure 8.4.
Without question, it is easier to activate the screen saver with the Control Panel than it is to edit the Registry directly. Activating the screen saver through the Control Panel automatically updates the Registry for you.
Figure 8.3. The Registry before the changes
Figure 8.4. The Registry after the screen saver is activated.
Changes to the Registry are not limited to user functions.
Because the Control
Panel is where the networking functions are set up, the resulting settings are also
in the Registry. DHCP settings are located in HKEY_LOCAL_MACHINE\System\CurrentControlSet\Services\CE2NDIS31\
Parameters\Tcpip (my
TCP/IP transport protocol is CE2NDIS31). Insert
your driver name to see your parameters. To find your transport protocol driver,
use Windows NT Diagnostics |
Network | Transports to see the available transports. Your card driver used for
TCP/IP
is the entry with the prefix NetBT. (See Figure 8.5.)
Figure 8.5. Using Windows NT Diagnostics to find network card drivers.
NOTE: DHCP allows the dynamic allocation of IP addresses and subnet masks for TCP/IP network protocols. If DHCP is turned off, you must go to every machine on the network and set the address and subnet mask for the system to use. If there is a duplicate address given or if an incorrect mask is used, the system is not able to communicate with the server for logon and file usage. If it is enabled, DHCP supplies addresses and the subnet mask from the server, so only one set of addresses and one subnet mask has to be entered. Using DHCP reduces administration time, increases accuracy of IP-address allocation, and eases troubleshooting. It is a real time-saver, and one that should be used.
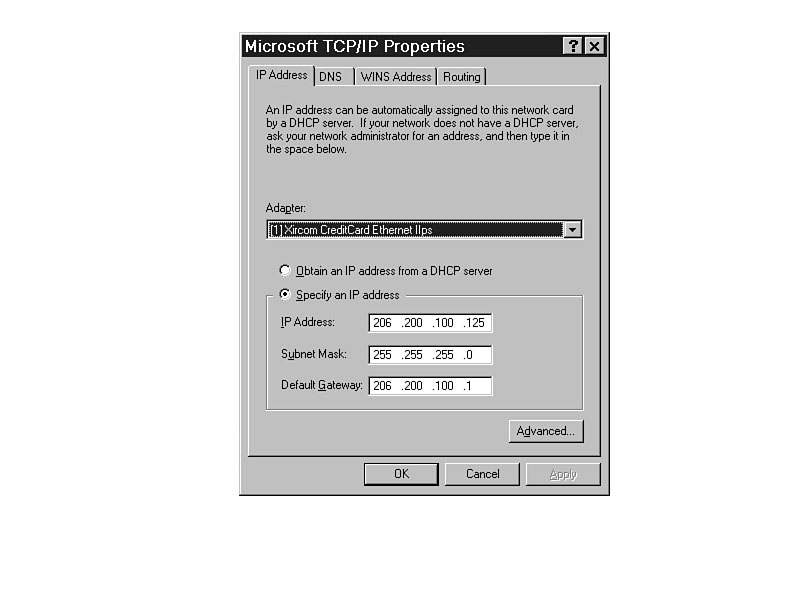
If your user has a fixed IP address and you need to change it, select Control Panel | Network | Protocols | TCP/IP Protocol | Properties, as shown in Figure 8.6.
Figure 8.6. Changing the allocation of IP addresses in NT.
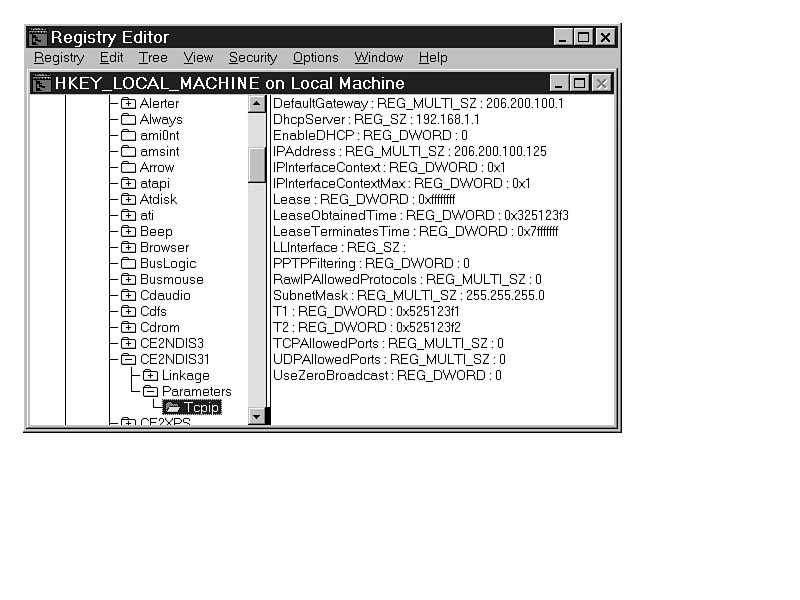
The Registry in Figure 8.7 shows a fixed IP address with DHCP allocation disabled.
The actual IP address is shown in theIPAddress value, and the subnet mask
is shown in the SubnetMask value.
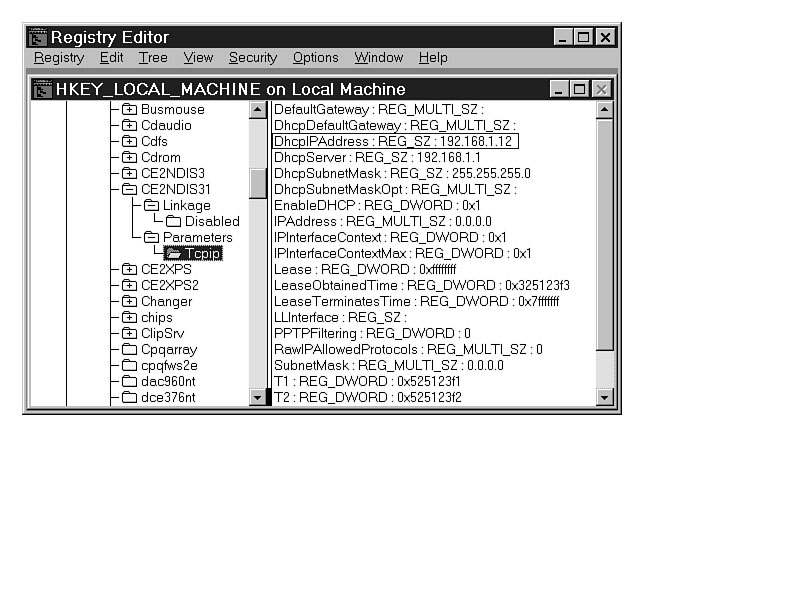
If you enable the Obtain an IP address from a DHCP server radio button in the Control Panel, the IPAddress and SubnetMask values are blank. The EnableDHCP value is activated (set to 1), and the IP address and the subnet mask are in the DhcpIPAddress and DhcpSubnetMask values, respectively. (See Figure 8.8.)
Obviously, it's best to make the change with the Control Panel, if possible.
Figure 8.7. The Registry entry for fixed IP address 206.200.100.125.
Figure 8.8. The Registry entry for DHCP-allocated IP address 192.168.1.12.
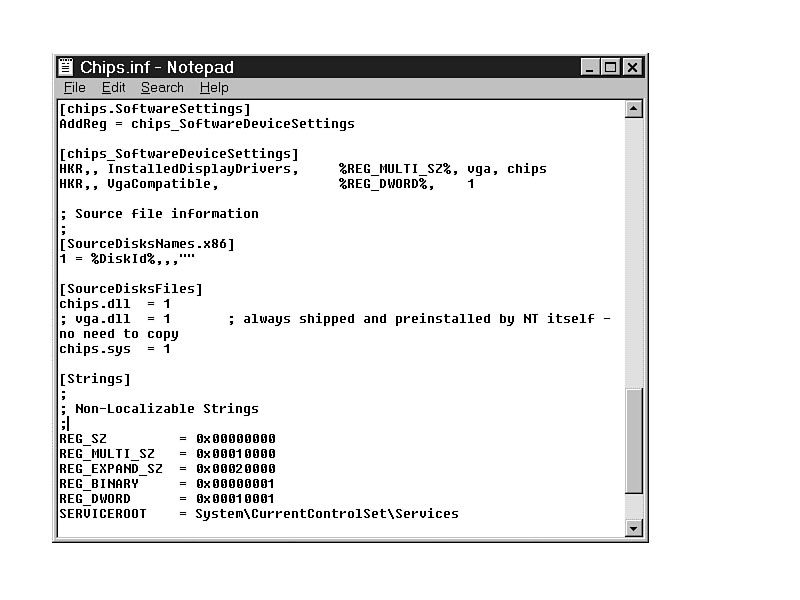
When software is installed, it usually changes the Registry. Usually, software engineers use files with specific entries called .INF files to make those changes. If the item is included with Windows NT, it might have a specific named .INF file, like the CHIPS.INF file, a configuration file for Chips & Technologies video cards. Most of the time, though, the file is called OEMSETUP.INF and set into individual directories based on the type of driver it is. In fact, on the NT Workstation installation CD-ROM, 136 of the 182 .INF files in the \DRVLIB directory tree are labeled OEMSETUP.INF.
Every time you select the option to install from disk, NT looks for a file called OEMSETUP.INF. Of course, there is more to that .INF than just Registry entries. Figure 8.9 shows part of the CHIPS.INF file, which is used to install a Chips & Technologies video card driver. Notice the entries that indicate the location of the files, and the entries in the Registry that point to the file locations.
Figure 8.9. Part of the CHIPS.INF file for a Chips & Technologies video card.
The actual installation of the video driver is performed by selecting Control Panel
| Desktop | Settings | Display Type | Change, as shown in Figure 8.10. Choose the
driver from the lists provided by Microsoft (not all drivers are supplied by Microsoft,
though) and click OK. The Control Panel copies the driver to the correct location
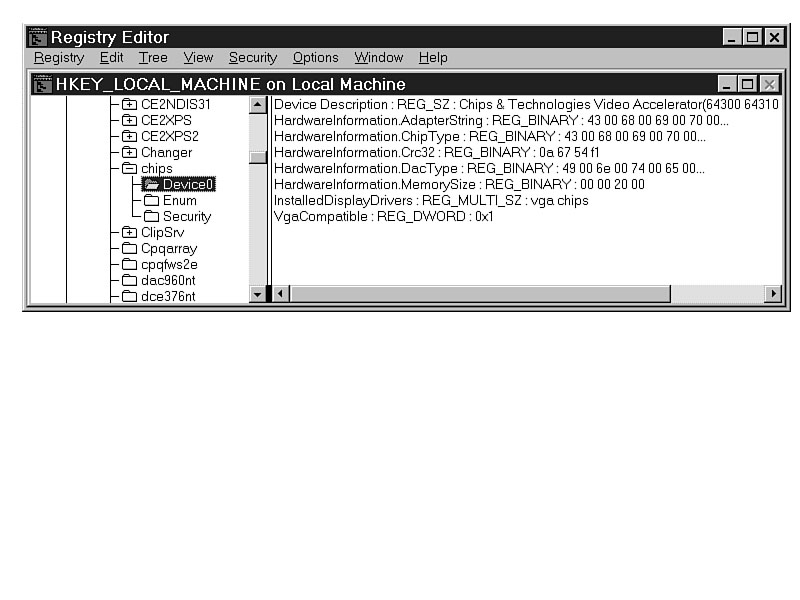
and makes the Registry entries for you, resulting in the entries shown in Figure
8.11.
If your driver is not listed or if you have an updated driver, simply click Have Disk and specify the location of the file. It looks for the OEMSETUP.INF file and uses it to install the driver.
Figure 8.10. Installing the Chips & Technology video driver.
Figure 8.11. Video-driver entries in the Registry.
Each user who has logged on to a system has a local profile on that system. When any changes are made to the desktop, they are saved in that local system's profile for that user. If that user goes to another system and logs on there, none of the changes follow from the original machine. He must re-create all the icons, menu items, wallpaper settings, and so on for the new machine.
Roaming profiles allow a user to have a consistent desktop, regardless of which system he logs on to. All user settings are on any system the user logs on to, without requiring the user to reconfigure the desktop. In Windows NT, the information for a roaming profile is stored in the Primary Domain Controller (PDC) in \WINNT\PROFILES\username\NTUSER.DAT. In Windows 95, the profiles are stored at the local machine in \Windows\Profiles\username\USER.DAT.
NOTE: Windows NT 4.0 profiles are different than those of Windows 95, and also different than those of Windows NT 3.5x. Because of those differences, each user will have to have a profile for each of the operating systems he uses.
When the user logs on, the profile is brought to the individual machine, and entries are made into the Registry, overriding the locally stored profile for the user. It is impossible to read the profiles with any sort of text editor, so it is impossible to see the exact contents of the file. However, the profile affects all the desktop entries, so it's safe to say that it changes the entries in the following keys in HKEY_CURRENT_USER:
System Policy Editor (SPE) has taken the place of the User Profile Editor that was available with NT 3.5x. With much more capability, SPE can make changes to registries for any computer or user on the domain, or all of them at once.
There is a System Policy Editor for Windows 95, and a separate one for Windows NT. Originally, Microsoft planned to have them work together, but a last-minute change was made that made the policy files they create incompatible. The actual work done and all of the processes are the same--just the final policy file is different. For more detail on the differences, see Chapter 28, "System Policy Editor: Understanding Policy Files."
The system administrator chooses policies to implement, and whether those policies will be for individuals, groups, or all users. When the policies are activated, they change user information in the Registry. Similarly, you can apply changes to computers, which updates HKEY_LOCAL_MACHINE.
After the policy changes are made, the user cannot avoid them. As soon as a user logs on to the network, the policy is implemented, and the Registry is updated. The policy overwrites any Registry change the user makes. Even if the user makes subsequent changes, they are changed back to the policy entries.
Though that might seem overly restrictive to some, it allows you to effectively manage the network from a single location.
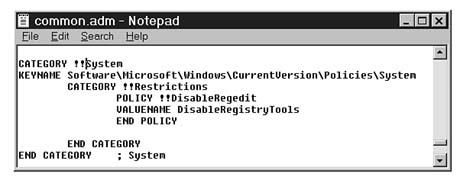
The files that SPE uses to update the Registry entries are templates, files with an .ADM extension. A sample is shown in Figure 8.12.
The actual change illustrated in Figure 8.12 determines whether the user can update the Registry manually using any type of Registry editor.
Figure 8.12. A portion of the COMMON.ADM file, which can update the Registry.
The System Policy Editor will be discussed in greater detail in Chapters 28 through
34. The important thing to note now is that the Registry gets changed without user
intervention. It is you
who intervenes on behalf of the organization.
Because you have several outside influences affecting and changing the Registry, it is important to understand the order in which those changes are made, which indicates the priority of those changes. The order is as follows:
Wherever the changes come from, it is easy to see the dynamic changes to the Registry, and how they affect your system use.
![]()
![]()
![]()
© Copyright, Macmillan Computer Publishing. All rights reserved.