![]()
![]()
![]()
![]()
The Registry is a precious and important part of the Windows NT system. Because so many things can go wrong with the Registry, and because such dire consequences are associated with its failure, it's imperative that you protect the Registry as much as possible. To protect against a failure of the Registry, there needs to be an additional copy to replace the corrupted one.
TIP: Motto: planning before prevention, prevention before anticipation, and anticipation before crisis. Dealing with the Registry is a perfect example of this motto in action. Mistakes with the Registry can turn into crises, so you must plan, prevent, and anticipate problems to avoid crises.
When discussing Registry protection, you might wonder whether you can copy and save the files to another disk, or whether you can copy the files from another system. The answer to both is a resounding no! Registry files are locked when NT is running, and only a special program can copy them to another location. This chapter presents four ways to protect the Registry:
Each Registry-protection strategy has its benefits and limitations. But whatever method you choose, back it up! Decreases in productivity because of Registry losses are shameful. It's no fun at all to get your system running after a disaster without a good backup. After you read this chapter, you'll know how to keep that from happening to you.
The Repair Disk Utility, RDISK.EXE, is the first step in protecting your Registry. It will create a partial copy of the Registry. Having that copy on the local computer's hard disk is a fast and easy way to recover from minor errors. This cannot be a regular copy from Explorer or File Manager, but must be created with RDISK.EXE. You can also create a disk copy of the information with it. Then, even if the system's hard disk is unusable, and the hard disk cannot read the repair data, there is still a way to recover the Registry. (This will be explained in detail in Chapter 5, "Recovering from an NT Registry Failure.")
When you installed Windows NT, you were prompted to create an Emergency Repair Disk, or ERD. You were also given an option to do it later. By the time you got to that point in the installation, you were probably tired of sitting there and chose not to create the disk. Unfortunately, that decision may come back to haunt you.
TIP: You should create an Emergency Repair Disk when you are prompted for it during installation.
However, you must do more than simply create an ERD. You must also maintain a current copy. The ERD holds the system section of the Registry. It includes the pointers to the drivers that are used to control the hardware and the settings for each of those drivers. Imagine the problems you would face if, after you changed or added a device (like a disk-drive controller), the Registry failed. If you repaired the current Registry with a Registry that has other settings or devices, the system might not work. Unfortunately, that has led to many a reinstallation of NT. So, you should update your Emergency Repair Disk every time you make a significant hardware or software change to the system.
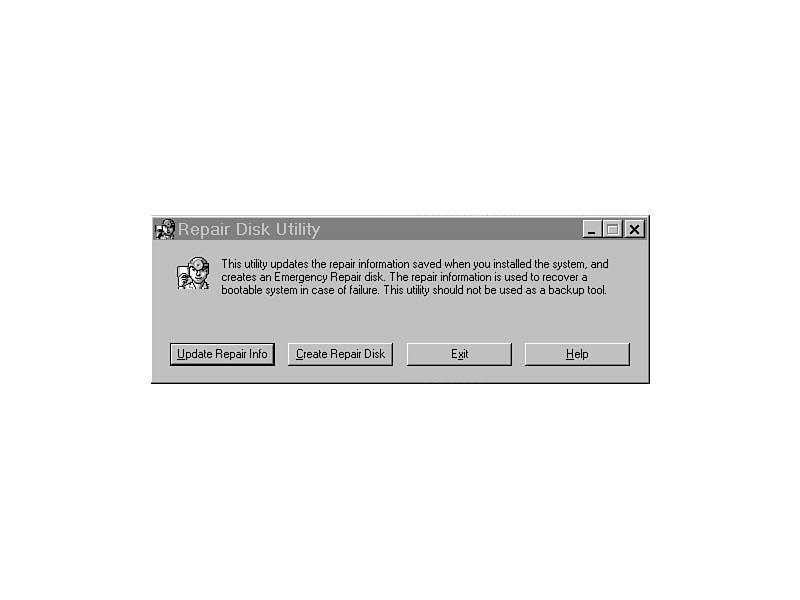
To update the safe copy of the Registry, create a new ERD. To update your current safe copy, run RDISK.EXE from the command prompt. That safe copy of the Registry is saved in a different location, and is not changed by editing or application installation. It is a snapshot copy of part of the Registry taken for later use. Running RDISK.EXE will bring up the dialog box shown in Figure 4.1. Select the Update Repair Info button to copy the Registry to a safe place on the hard disk drive, and the Create Repair Disk button to copy it onto a floppy disk.
Figure 4.1. Opening dialog box for the Repair Disk Utility, RDISK.EXE.
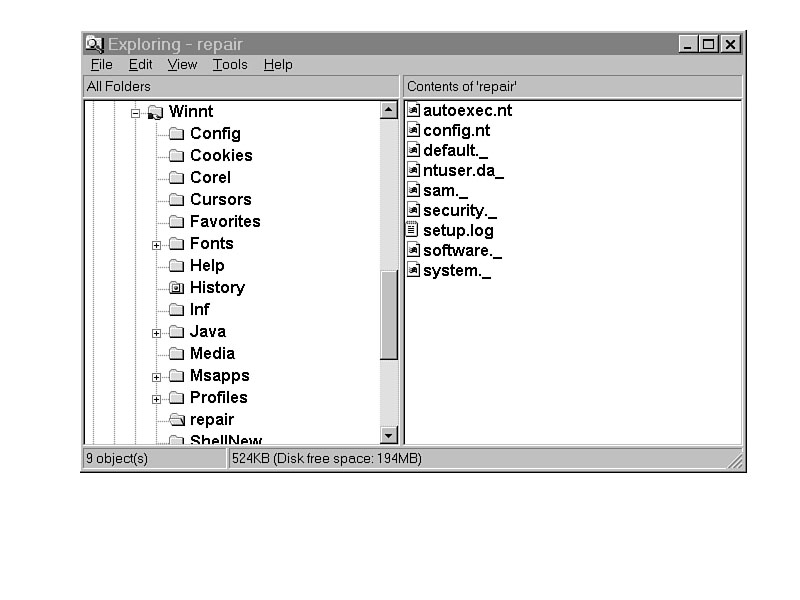
Click the Update Repair Info button to change the system information in the \WINNT\REPAIR
directory (shown in Figure 4.2).
RDISK.EXE replaces selected files that are saved in the \REPAIR directory with new files that contain updated information about the system configuration. As Figure 4.2 illustrates, not all Registry files are saved, so running the Repair Disk Utility is not all that you should do to protect your systems. The files are saved in a compressed format, so they can fit on a high-density disk.
To copy the files to the disk, choose Create Repair Disk from the options shown in Figure 4.1. The Repair Disk Utility will format the disk before saving the configuration files, so any data currently on the disk will be lost.
Figure 4.2. Files in the \WINNT\REPAIR directory.
TIP: Label the disk with the computer name (the one it uses in NT) and date it. For example, if you make a new ERD for the system called SALES1 on January 12, 1997, create a label that includes that information, plus your name, so others can talk with you if there are problems. That will make it easier to select the correct disk for repairs, and help the user get back up and running sooner.
NOTE: Running RDISK.EXE -S will automatically save the repair information to the hard disk. After that information is saved, you will be prompted to create a repair disk, which will be an additional safety net. The information saved to the hard disk is actually the data used to restore the Registry with Last Known Good, as described in Chapter 5. The ERD is used in conjunction with the installation program to repair the system. It will also be explained in Chapter 5.
Last Known Good relies on the information stored on the hard disk for its repair functions. If you don't save the information to the hard disk, Last Known Good restores old information, possibly causing the system to fail. Run RDISK.EXE regularly to ensure that your Registry is protected, both on the hard disk and on the Emergency Repair Disk.
Microsoft includes a utility to back up files, including Registry files, called NT Backup. It requires a supported tape drive, and can back up and restore files from any drives on the local system, as well as from any network-connected drives. It can back up those drives whether they use the Windows NT file system (NTFS) or the file allocation table (FAT) file system. It is powerful, very fast, and fully integrated into Windows NT.
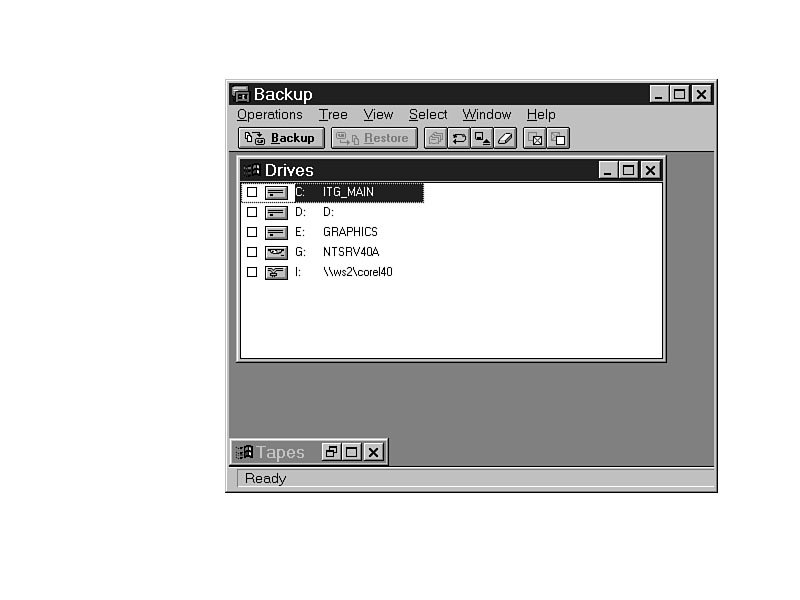
To launch NT Backup, select Start | Programs | Administrative Tools and click Backup. The opening window (shown in Figure 4.3) shows the available drives on the system, plus any that are mapped from other systems on the network. It's possible to back up and restore local and remote files on any NTFS or FAT volumes from your own computer using an attached tape drive.
Figure 4.3. Select the drives to back up with NT Backup.
Choosing a drive automatically selects all the directories and
files on the drive.
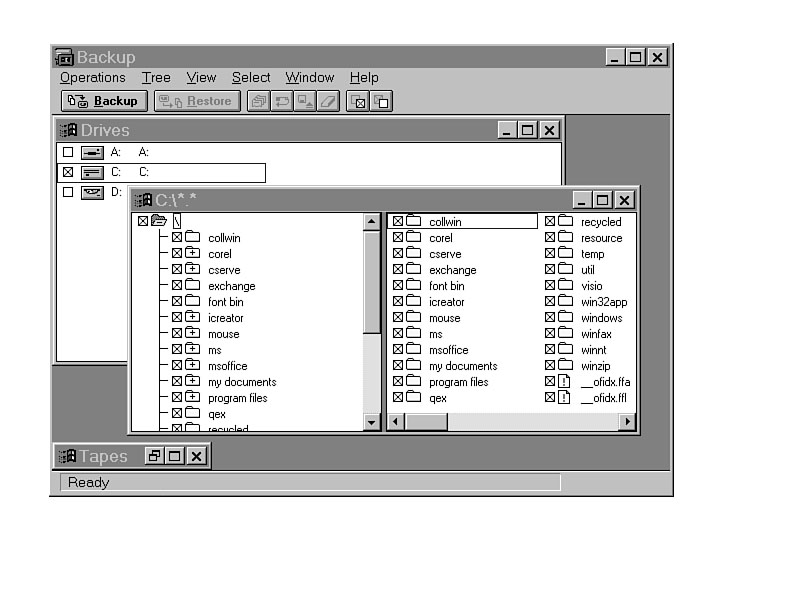
Double-click the drive letter, and the files that are in the directory are shown.
Figure 4.4 shows the list of the files. Deselect any that you do not want to back
up. Most of the time, the only reason not to back up information is
if there is a
limited amount of space on the tape. Then you could choose not to back up something
that you already had a good copy of.
WARNING: Some people mistakenly believe that if they have the software on disk, they don't need to back it up. If you don't back up the software as well as the data, it may take days to get all the software correctly installed again.
Figure 4.4. NT Backup offers an easy way to back up the Registry.
TIP: Deselect the paging file (in the \WINNT directory) so it will not be backed up. There is no need to back it up because NT will recreate it if it is missing. Deselecting it will save a lot of tape space and boost your backup performance.
The files can be backed up by individual files (including hidden files), directories, whole volumes, or multiple volumes. Verification is available to ensure reliable backups or restorations, and access can be limited to the owner or administrator. However, the Registry is not automatically backed up. Without a backup of the Registry, even if the files are restored to a new system, the applications won't work. On the other hand, restoring a Registry over a new system with different hardware could make the hardware inaccessible.
TIP: If you are backing up your system for protection against disaster, make sure the Registry is fully backed up. If you are going to move the data to another system, use the advanced features in Chapter 10, "Making Manual Changes to the Registry Using REGEDIT.EXE," to copy only portions of the HKEY_LOCAL_MACHINE/Software keys to the new system.
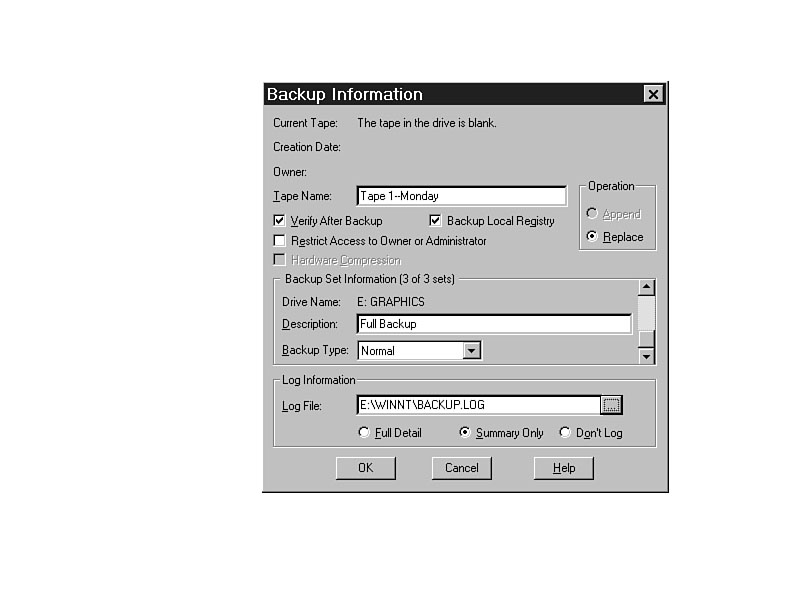
To add a copy of your registry to the backup set, choose Operations | Backup and select the local drive where the Registry is stored. Then select the Backup Local Registry check box, as shown in Figure 4.5.
There is no option to include the Registries of the other computers, however. That must be done from the local machine only, and is one of the major limitations of NT Backup. For an alternative choice of programs, see the "Professional Backup Programs for Windows NT" section near the end of this chapter.
Figure 4.5. Choosing to include the local Registry in the backup.
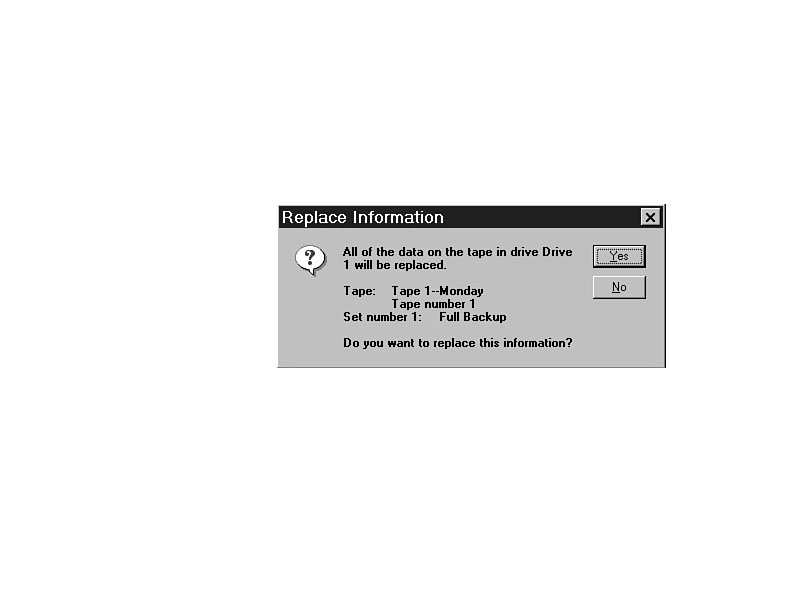
After the drives are selected and you choose to
continue to back up the drive, NT
Backup prompts you for information about the tape. If you are using a new tape, you
will be asked to supply a name for it. If you have inserted a tape that has been
used previously, you will be given the choice to
retain the name or to rename the
tape, as shown in Figure 4.6.
Figure 4.6. Tape information is critical for later backup.
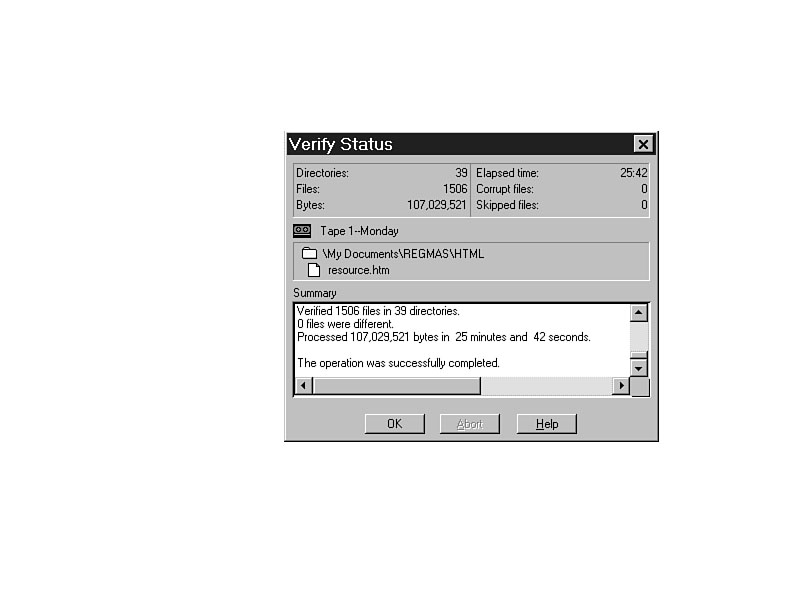
When the backup is completed, a notice similar to the one shown in Figure 4.7 appears
on-screen. It is then okay to remove and secure the tape in a safe place for use
in case of disaster.
Figure 4.7. The Verify Status screen, shown after a successful backup.
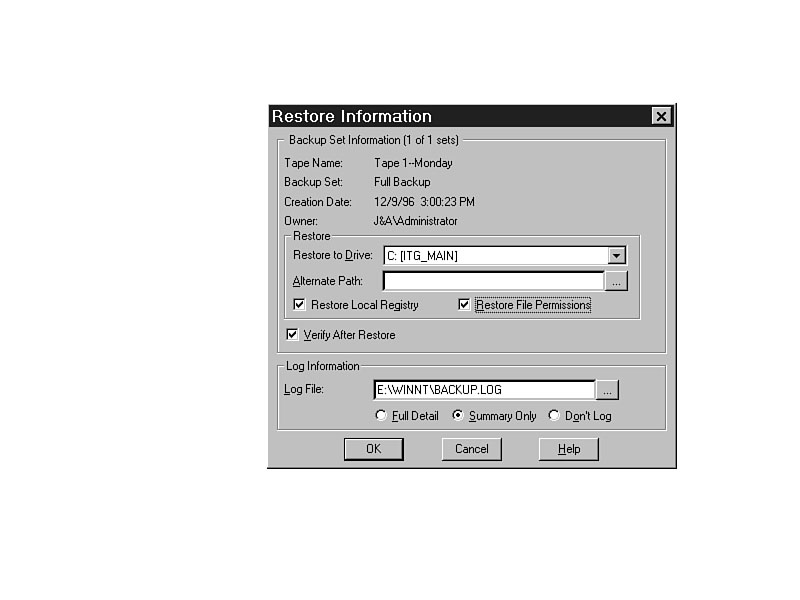
WARNING: Never remove the tape until NT Backup indicates that it is safe to do so. The only times it will tell you to do that is when the backup is finished, another tape is required to finish the backup, or if the tape is defective. To get all of the data back into the system, you need to restore it using NT Backup. Windows NT must be running with a supported tape drive installed. The restoration process is discussed in greater detail in Chapter 5. Just as a note, though, you can restore the Registry files by selecting Operations | Restore and checking the Restore Local Registry check box. You will also be given the opportunity to restore file permissions, which is critical. Figure 4.8 shows the screen that gives you that option.
Figure 4.8. Dont forget to restore the Registry if necessary.
NT Backup can also be run from the command line, which allows any desired options to be activated with a single command. When NT Backup is then launched, no additional user input is required. Choosing the /b command-line option backs up the local Registry.
Other options that can be
used on the command line are shown in Table 4.1.
Table 4.1. Command-line backup options.
| Option | Description |
| backup | Sets the system to back up the drives. |
| restore | Sets the system to restore the data. |
| /t (type) | Specifies the type of backup (normal backs up all files; incremental only backs up files that changed since the last backup). |
| /a | Appends the new backup at the end of the current data on the tape. If this option is not selected, the data currently on the tape will be overwritten. |
| /v | Verifies the backup operation to ensure it went as planned. |
| /r | Restricts file access to the owner or administrator. The Backup operators can still back up and restore, but they cannot read the files. |
| /d text | Sets a description of the backup contents. |
| /hc:on or /hc:off | Turns on or off hardware compression. |
WARNING: Just because you chose the Verify option and it finished with no errors doesn't mean that your backup is error-free. The only way to ensure that your data will be available is to use multiple tapes, rotating them daily. Use a Monday tape set, a separate set for Tuesday, and so on. Then make an extra set for the weekend. Also, keep them off-site for protection against damage and theft.
TIP: Backup tapes will not last forever. Replace them annually to ensure correct backups.
If you wanted to back up all the files on your
local drives (C: and D:),
back up the Registry, verify the operation, and name the backup "Full Monthly
Backup", the command line
would be
ntbackup backup C: D: /t normal /v /d
"Full Monthly Backup"
If you wanted to back up only the files that have changed on drives M: and N: (mapped from other systems on the network), verify the backup, and name it "3/12/97 Changes", the command line would be
ntbackup backup M: N: /t incremental /v /d "3/12/97 Changes"
Whatever your choices, it would be very easy to add that line to a batch file, making it simpler to activate the backup process.
The three most pressing limitations of NT Backup are
The AT command sets up a schedule to run programs at a specified time and date. It can run on your own computer, or you can schedule it to run on another. The Schedule service must be running for the AT command to work. To activate the Schedule service, select Services in the Control Panel. Scroll to find Schedule and change the Startup options. If you will be using the AT command, you must set the Schedule service startup option to Automatic.
After the AT command puts the command into the Schedule service, the service takes over and launches the application at the appointed time.
NOTE: Because scheduled commands are stored in the Registry, scheduled tasks are not lost if you have to restart the Schedule service or your computer.
To back up all the files on the C: drive and in the Registry on the server called BACKSERV every night at 10:00 p.m., use the following command:
AT \\BACKSERV 22:00 /every: M,T,W,Th,F "ntbackup.exe backup c:\ /b"
TIP: Without any parameters listed, AT lists currently scheduled commands in the queue. After you queue your command, run AT without any parameters to see if it's actually listed in the schedule.
NOTE: To use the AT command, you must be a member of the local administrators group. If you are not a member, you will receive an error, and the command will not be put in the Schedule queue.
Unfortunately, the AT command is not particularly reliable. Sometimes it works, and sometimes it doesn't. The Schedule service does its job very well, and as long as the command is queued correctly, it will work. Unfortunately, the reliability of the AT command to get the command queued is questionable.
Even if the command is used correctly with no syntax errors, it will not always work. In fact, there are times when a batch file will work, and other times when the same file will not. Because of this, it is not recommended.
Microsoft, by its own admission, does not offer the best in system utilities. It focuses on the core operating system, and depends on third-party companies to fill in when NT utilities need extra help. In many cases, shareware applications can adequately meet the needs of most users. Unfortunately, no shareware backup programs are currently available. The amount of effort involved to create and maintain a top-quality program requires it to be a commercial product. Third-party backup programs can even be quite expensive. However, for the money, the programs listed here do an outstanding job of maintaining a backup for nearly any size organization. For that reason, most system administrators go to a professional-level backup program and use one of the following programs.
Table 4.2 lists the programs that are currently considered to be the best professional
backup
programs for Windows NT. Each has its benefits and shortcomings, and some
are better at certain tasks than others. You can find reviews of these products in
computer magazines and at Internet sites (such as www.winntmag.com).
Table 4.2. Professional backup programs for Windows NT.
| Product | Company | Phone Number |
| ARCServe | Cheyenne Software | 800-243-9462 |
| NetWorker | Legato | 415-812-6000 |
| Backup Exec | Seagate Software | 800-327-2232 |
| Storage Manager | Seagate Software | 800-327-2232 |
| Backup Director | Seagate Software | 800-327-2232 |
| UltraBac | Barratt Edwards Intl | 206-644-6000 |
TIP: Cheyenne ARCServe, version 6, allows you to restore a full Windows NT system to a completely bare drive. It comes with a DOS command-line utility that allows the restoration without NT already running. As of this writing, it is the only product on the market that allows that. However, other products will soon catch up and include that feature. If at all possible, get software with that feature. Not only will it save you time, but it will also ensure that your entire system gets restored. In the Advanced Registry Editing section of Chapter 7, "Recovering from a Windows 95 Registry Failure," you'll find a tip urging you to restore shares to an existing Windows NT system because a restore from tape will not do it. By using ARCServe version 6, or others that have the same feature, you will eliminate that requirement.
No matter what type of program you use, you can make different types of backups depending on the type of data to be backed up, tape capacity, and personal preference. The type of backup you perform also affects your restoration process (as shown in Chapter 5). The two most common types are full backups and incremental (or differential) backups.
As the name implies, a full backup backs up everything on the hard drives. Full backups offer the best protection and the easiest restoration; they also require the most tape capacity. Without sufficient capacity, you might have to use additional tapes, which eliminates the possibility of performing unattended backups in the middle of the night. However, full backups make the most sense for a data server, where most of the files change every day anyway.
By reducing the backup to only the files that have changed, the tape capacity can be significantly reduced. The tape backup program examines the attributes of the files on the hard drive to determine whether they have changed. If they have changed, they are backed up.
An effective backup strategy is to perform a full backup once a week or once a month. In between the full backups, simply back up any files that have changed. Every backup program mentioned in Table 4.2 is capable of performing both types of backups.
NOTE: Microsoft recommends that you create a 300-500MB boot and system volume so that you can easily recover from a Registry or disk-drive disaster. By having that volume and booting to a DOS-based operating system, the Registry files are no longer locked and can be copied without limitation. Applications and data files can be put on an NTFS volume using RAID 5 (striping with parity), ensuring their availability (even in the case of a disk-drive failure). The only problem with this is that FAT volumes offer none of the protection or fault tolerance offered by NTFS volumes. In essence, you must choose between easy copying and restoration versus fault tolerance and security. One solution to this dilemma is to use hardware RAID instead of the software RAID included in Windows NT. Then, you would get optimum protection and still have the ability to boot to DOS and copy or restore the Registry easily.
The disadvantage of an incremental backup strategy is in its restoration after a crash. The restoration process requires that you go back to the full backup and restore it, then restore every incremental backup in order (without skipping any). Skipping is dangerous because the skipped backup may contain a file that was never changed (and hence, was never backed up) on any of the other tapes.
Hives are only locked from use when NT is running. If you boot to another system, DOS, Windows 95, or even another copy of Windows NT, you can easily copy all the files in the \WINNT\SYSTEM32\CONFIG directory to another drive (even to a removable media drive like the ZIP or JAZ drives from Iomega). It's a fast and easy way to copy files, and it's also very easy to restore them. Simply highlight the files in File Manager (Windows 3.x) or Explorer (Windows 95) and copy them to another location.
If the system volume (where NT is stored) is a FAT volume, any other operating system can see and copy the files. If the system volume is NTFS, only NT, Linux, and utilities such as NTFSDOS.EXE can read and copy them.
NOTE: Beware of the potential security problems associated with Linux and NTFSDOS.EXE. If you can copy the files, so can others. The only real protection you have for your files is physical security: locking them behind closed doors, forcing others to access them through the network.
No matter how you decide to back up the Registry, it's crucial that you do it. It's recommended that you perform more than one backup, using the RDISK.EXE utility for immediate help, and using a backup program as a part of your everyday routine as insurance against other crashes.
Protect your backups and your repair disks, and be diligent about maintaining your Last Known Good information. Maybe you will be one of the rare people who never need it, but at least you will sleep better knowing you are well protected.
![]()
![]()
![]()
© Copyright, Macmillan Computer Publishing. All rights reserved.